3Com WX2200 Hardware Installation Guide - Page 38
Connecting to a Serial Management Console, System Software Quick Start Guide for instructions. - troubleshooting
 |
UPC - 662705511191
View all 3Com WX2200 manuals
Add to My Manuals
Save this manual to your list of manuals |
Page 38 highlights
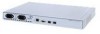
38 CHAPTER 2: INSTALLING AND CONNECTING A WX SWITCH Connecting to a Serial Management Console Initial configuration of the WX switch requires a connection to the switch's CLI through the serial console port. Figure 11 shows how to install a serial cable on the WX switch. Refer to this figure as you perform the procedure. (For cable requirements, see "Serial Console Cable" on page 26.) Figure 11 Serial Cable Installation Serial port Serial cable Serial port on computer To connect a PC to the serial console port: 1 Insert the serial cable into the PC port as shown in Figure 11. 2 Insert the other end of the cable into the serial console port on the WX switch as shown in Figure 11. 3 Start a standard VT100 terminal emulation application on the PC, and configure the following modem settings: „ 9600 bps „ 8 bits „ 1 stop „ No parity „ Hardware flow control off or disabled 4 Open a connection on a serial port. „ If the WX switch is already powered on, press Enter three times to display a command prompt. For example: WX1200> See "Using the quickstart Command (any model)" of the "Mobility System Software Quick Start Guide" for instructions. „ If a command prompt does not appear, go to "Troubleshooting a Serial Management Connection".
-
 1
1 -
2
-
3
-
4
-
5
-
6
-
7
-
8
-
9
-
10
-
11
-
12
-
13
-
14
-
15
-
16
-
17
-
18
-
19
-
20
-
21
-
22
-
23
-
24
-
25
-
26
-
27
-
28
-
29
-
30
-
31
-
32
-
 33
33 -
 34
34 -
 35
35 -
 36
36 -
 37
37 -
 38
38 -
 39
39 -
 40
40 -
 41
41 -
 42
42 -
 43
43 -
44
-
45
-
46
-
47
-
48
-
49
-
50
-
51
-
52
-
53
-
54
-
55
-
56
-
57
-
58
-
59
-
60
-
61
-
62
-
63
-
64
-
65
-
66
 |
 |
