3M M1700SS User Guide - Page 22
Testing the M1700SS Display
 |
UPC - 511199609764
View all 3M M1700SS manuals
Add to My Manuals
Save this manual to your list of manuals |
Page 22 highlights
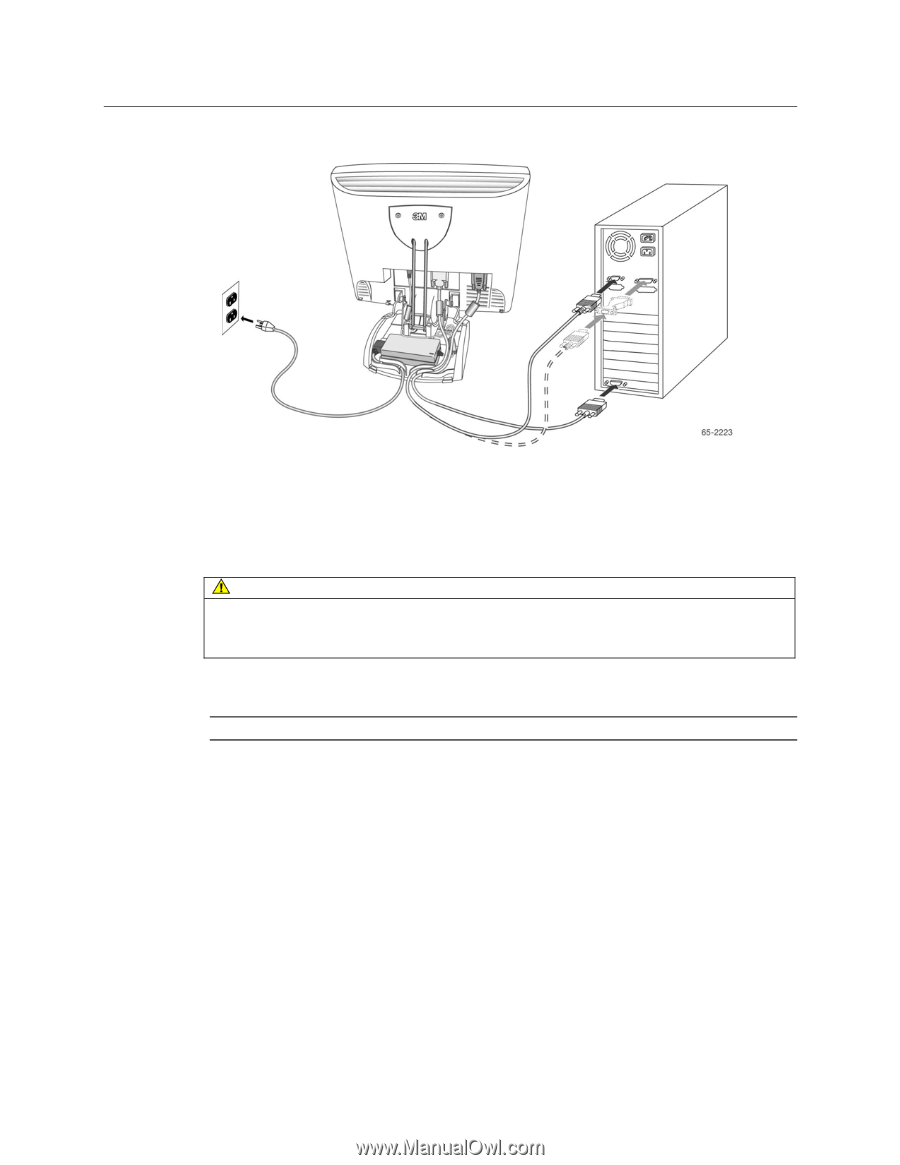
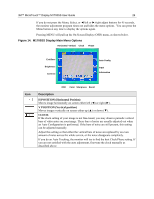
3M™ MicroTouch™ Display M1700SS User Guide 22 Figure 12. Connecting the M1700SS Display Cables to your Computer You should be sure all cable connections are secure -- tighten all cable screws. Shaking and vibration may dislodge cables that are improperly connected. Route all wiring and cabling away from heat sources and sharp metal edges to avoid damage. Also, keep the touch sensor cable away from sources of electromagnetic and radio frequency interference. WARNING To avoid the risk of electric shock which could result in serious injury or death: • Do not use a damaged power supply. • Do not use a power cord that is frayed or otherwise damaged. Testing the M1700SS Display Note: The M1700SS Display has a power status LED located on the front of the bezel. After connection, turn on the power switch located on the front bezel. Before you test your display, make sure all cables are connected properly and routed through the cable management system. Be sure to tighten all cable screws. To test that the display is working properly: 1. Turn on your computer. 2. Make sure the video image is displayed. If it is not, turn on your display. Ensure the LED is green - orange indicates power but no signal. 3. Make sure the video image is centered within the sensor area. Use the display controls to adjust the image, if necessary. Perform an Auto Config first, then if you wish you can adjust the horizontal and vertical position, contrast, and brightness to better suit your video card and your personal preference. Refer to Chapter 3 for more information on using the on-screen menu to adjust the video display.
-
 1
1 -
2
-
3
-
4
-
5
-
6
-
7
-
8
-
9
-
10
-
11
-
12
-
13
-
14
-
15
-
16
-
 17
17 -
 18
18 -
 19
19 -
 20
20 -
 21
21 -
 22
22 -
 23
23 -
 24
24 -
 25
25 -
 26
26 -
 27
27 -
28
-
29
-
30
-
31
-
32
-
33
-
34
-
35
 |
 |