ASRock ALiveDual-eSATA2 RAID Installation Guide - Page 15
E. Rebuilding a RAID Array
 |
View all ASRock ALiveDual-eSATA2 manuals
Add to My Manuals
Save this manual to your list of manuals |
Page 15 highlights
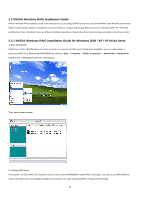
2. Click Next and the following screen shot will appear. 3. Click Finish and the array will be deleted and the following screen shot will appear showing all the free disks. A similar process can be applied to delete any array created by NVIDIA RAID. E. Rebuilding a RAID Array Rebuilding is the process of recovering data from one hard drive to another. All data is copied from one hard drive to another and then the data is synchronized between the two hard drives. After creating a mirrored array, you can rebuild the array using the following steps: 1. Go to Windows and run the NVIDIA RAID Management utility. 1. Go to Windows and run the NVIDIA RAID Management utility. 15
-
 1
1 -
2
-
3
-
4
-
5
-
6
-
7
-
8
-
9
-
 10
10 -
 11
11 -
 12
12 -
 13
13 -
 14
14 -
 15
15 -
 16
16 -
 17
17 -
 18
18 -
 19
19 -
 20
20 -
21
-
22
-
23
-
24
-
25
-
26
-
27
-
28
-
29
-
30
-
31
-
32
-
33
-
34
-
35
-
36
 |
 |

15
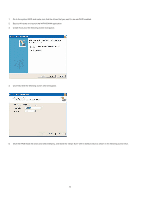
2. Click Next and the following screen shot will appear.
3. Click Finish and the array will be deleted and the following screen shot will appear showing all the free disks.
A similar process can be applied to delete any array created by NVIDIA RAID.
E. Rebuilding a RAID Array
Rebuilding is the process of recovering data from one hard drive to another. All data is copied from one hard drive to another and then the data is
synchronized between the two hard drives. After creating a mirrored array, you can rebuild the array using the following steps: 1. Go to Windows
and run the NVIDIA RAID Management utility.
1. Go to Windows and run the NVIDIA RAID Management utility.