ASRock ALiveDual-eSATA2 RAID Installation Guide - Page 35
Create RAID from Existing Disk, 2.2.3 Remove RAID
 |
View all ASRock ALiveDual-eSATA2 manuals
Add to My Manuals
Save this manual to your list of manuals |
Page 35 highlights
The information of the created disk array displays in the window. 3.2.2.2 Create RAID from Existing Disk You can combine the Existing Disk (Source disk may content OS and Data) with other HD (must be larger than source Disk) to be RAID. The data on Source Disk will be reserved. After RAID is built, system will need to reboot. Left-Click the "Create RAID from Existing Disk" icon on the toolbar. Then follow the instructions on the screen. 3.2.2.3 Remove RAID Right-click the name of the disk array you want to delete and the "Remove" menu will appear. Select the "Remove Raid" of the pop-up menu. Then follow the instructions on the screen. 35
-
 1
1 -
2
-
3
-
4
-
5
-
6
-
7
-
8
-
9
-
10
-
11
-
12
-
13
-
14
-
15
-
16
-
17
-
18
-
19
-
20
-
21
-
22
-
23
-
24
-
25
-
26
-
27
-
28
-
29
-
 30
30 -
 31
31 -
 32
32 -
 33
33 -
 34
34 -
 35
35 -
 36
36
 |
 |

35
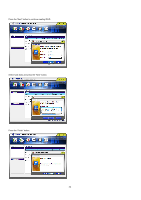
The information of the created disk array displays in the window.
3.2.2.2 Create RAID from Existing Disk
You can combine the Existing Disk (Source disk may content OS and Data) with other HD (must be larger than source Disk) to be RAID. The data
on Source Disk will be reserved. After RAID is built, system will need to reboot.
Left-Click the “Create RAID from Existing Disk” icon on the toolbar. Then follow the instructions on the screen.
3.2.2.3 Remove RAID
Right-click the name of the disk array you want to delete and the “Remove” menu will appear.
Select the “Remove Raid” of the pop-up menu. Then follow the instructions on the screen.