ASRock ALiveDual-eSATA2 RAID Installation Guide - Page 7
RAID Configurations Precautions, 1.3 Create Disk Array
 |
View all ASRock ALiveDual-eSATA2 manuals
Add to My Manuals
Save this manual to your list of manuals |
Page 7 highlights
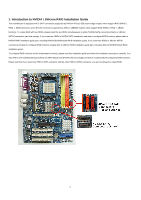
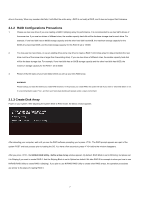
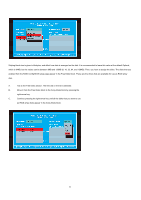
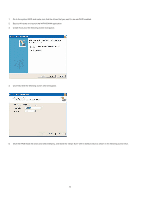
drive in the array. When any member disk fails, it will affect the entire array. JBOD is not really a RAID, and it does not support fault tolerance. 2.1.2 RAID Configurations Precautions 1. Please use two new drives if you are creating a RAID 0 (striping) array for performance. It is recommended to use two SATA drives of the same size. If you use two drives of different sizes, the smaller capacity hard disk will be the base storage size for each drive. For example, if one hard disk has an 80GB storage capacity and the other hard disk has 60GB, the maximum storage capacity for the 80GB-drive becomes 60GB, and the total storage capacity for this RAID 0 set is 120GB. 2. You may use two new drives, or use an existing drive and a new drive to create a RAID 1 (mirroring) array for data protection (the new drive must be of the same size or larger than the existing drive). If you use two drives of different sizes, the smaller capacity hard disk will be the base storage size. For example, if one hard disk has an 80GB storage capacity and the other hard disk has 60GB, the maximum storage capacity for the RAID 1 set is 60GB. 3. Please verify the status of your hard disks before you set up your new RAID array. WARNING!! Please backup your data first before you create RAID functions. In the process you create RAID, the system will ask if you want to "Clear Disk Data" or not. It is recommended to select "Yes", and then your future data building will operate under a clean environment. 2.1.3 Create Disk Array Power on your system. After adjusting the system BIOS to RAID mode, the below window appears. After rebooting your computer, wait until you see the RAID software prompting you to press . The RAID prompt appears as a part of the system POST and boot process prior to loading the OS. You have a few seconds to press before the window disappears. After you press , the NVIDIA RAID Utility - Define a New Array window appears. By default, RAID Mode is set to Mirroring, but please set it to Striping if you want to create RAID 0. And the Striping Block is set to Optimal as default. We take RAID 0 for example to show you how to use NVRAID RAID Utility to create RAID 0 (Striping). If you plan to use NVRAID RAID Utility to create other RAID arrays, the operation procedures are similar to the steps of creating RAID 0. 7
-
 1
1 -
 2
2 -
 3
3 -
 4
4 -
 5
5 -
 6
6 -
 7
7 -
 8
8 -
 9
9 -
 10
10 -
 11
11 -
 12
12 -
13
-
14
-
15
-
16
-
17
-
18
-
19
-
20
-
21
-
22
-
23
-
24
-
25
-
26
-
27
-
28
-
29
-
30
-
31
-
32
-
33
-
34
-
35
-
36
 |
 |
