Adobe 16001500 Migration Guide - Page 26
Filters and effects
 |
UPC - 718659425425
View all Adobe 16001500 manuals
Add to My Manuals
Save this manual to your list of manuals |
Page 26 highlights
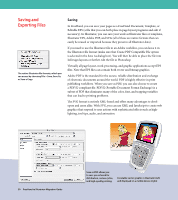
3D effect Drop shadow with spot color WORKING WITH GRAPHICS Filters and effects Many commands for changing the look of objects are available in both the Filter and Effect menus. For example, all of the commands in the Filter > Artistic submenu are also listed in the Effect > Artistic submenu. However, filters and effects result in different outcomes, so it's important to understand the difference in their use. Effects are live, which means you can apply an effect to an object and then continue to modify the effect's options or remove the effect using the Appearance palette. Effects are nondestructive because they don't change the underlying object. Once you apply an effect to an object, the Appearance palette lists the effect and enables you to edit, move, duplicate, or delete the effect, or save it as part of a graphic style. Filters, on the other hand, change the underlying object, and the changes can't be modified or removed after the filter is applied. One advantage to reshaping an object with a filter command is that you have immediate access to the new or modified anchor points created by the filter. (An effect must be expanded before you have access to the new points.) If the filters and effects are unavailable, check the color mode of your document (File > Document Color Mode); most filters and effects work only on documents that are in the RGB color mode. Also note that when you apply filters or effects to linked bitmap images, the images will be unlinked and be embedded in the document. Warping effect Document Raster Effects Settings Document raster effects settings Whenever you apply a raster effect such as Blur or Sketch, Illustrator uses the document's raster effects settings to determine the resolution of the resulting image. These settings have a large impact on the resulting artwork; therefore, it's important to check the document raster effects settings before you start working with filters and effects, and more importantly, before you export or print your artwork. You set rasterization options in the Document Raster Effects Settings dialog box (Effect > Document Raster Effects Settings).. Working with Graphics 25
-
 1
1 -
2
-
3
-
4
-
5
-
6
-
7
-
8
-
9
-
10
-
11
-
12
-
13
-
14
-
15
-
16
-
17
-
18
-
19
-
20
-
 21
21 -
 22
22 -
 23
23 -
 24
24 -
 25
25 -
 26
26 -
 27
27 -
 28
28 -
 29
29 -
 30
30 -
 31
31 -
32
-
33
-
34
-
35
-
36
-
37
-
38
-
39
-
40
-
41
-
42
-
43
-
44
 |
 |
