Adobe 65024500 User Guide - Page 14
Elements, Text Element, Image, Graphic, Links Palette
 |
UPC - 883919166476
View all Adobe 65024500 manuals
Add to My Manuals
Save this manual to your list of manuals |
Page 14 highlights
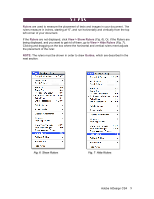
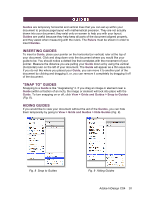
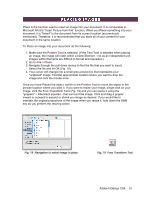
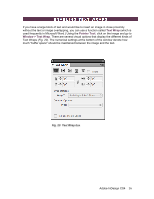
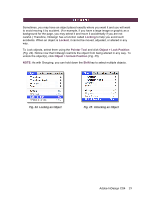
Now that you have learned how to insert and edit text Elements, you need to understand how to work with other kinds of objects within your document. Nearly every InDesign document will contain text, and/or graphics. Using the three together takes thorough knowledge of InDesign's capabilities. For the purposes of this tutorial, it is important to understand the kind of "objects" to which this tutorial refers: • Text (Element) - A block of text within a defined "text box" (discussed in a previous section). • Image - A picture file with one of the following extensions: .jpg, .gif, .tif, .pct, or .bmp. • Graphic - Tables, charts, graphs, vector art, etc. created in another program such as Microsoft Excel or Adobe Illustrator. InDesign is a linking device; it does not create images or graphics, rather, it pulls existing ones from various places and allows you to arrange them; therefore, when inserting images and graphics into your document, you should never use the "copy & paste" technique. Instead, save your images and graphics in the same folder as your InDesign document, and "link" them into the document (discussed in the next section). You can view the source location of the images and graphics that are linked into your document by going to the Links Palette (Fig. 16 and 17). The following sections offer an in depth explanation of how to insert and adjust images, graphics, and Elements within your document. • Placing Images (Page 15) • Enabling Text Wraps (Page 16) • Layers and Arranging (Page 17) • Grouping (Page 18) • Locking (Page 19) Fig. 16 Navigation to Links Palette Fig. 17 Links Palette Adobe InDesign CS4 14
-
 1
1 -
2
-
3
-
4
-
5
-
6
-
7
-
8
-
 9
9 -
 10
10 -
 11
11 -
 12
12 -
 13
13 -
 14
14 -
 15
15 -
 16
16 -
 17
17 -
 18
18 -
 19
19 -
20
-
21
 |
 |
