Apple MA970LL User Manual - Page 53
hold the drive by its sides. To avoid damaging the drive, don't touch the printed circuit
 |
UPC - 885909168606
View all Apple MA970LL manuals
Add to My Manuals
Save this manual to your list of manuals |
Page 53 highlights
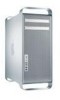
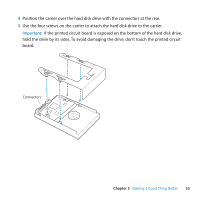
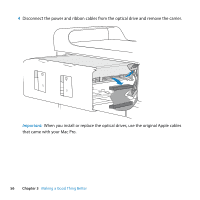
4 Position the carrier over the hard disk drive with the connectors at the rear. 5 Use the four screws on the carrier to attach the hard disk drive to the carrier. Important: If the printed circuit board is exposed on the bottom of the hard disk drive, hold the drive by its sides. To avoid damaging the drive, don't touch the printed circuit board. Connectors Chapter 3 Making a Good Thing Better 53
-
 1
1 -
2
-
3
-
4
-
5
-
6
-
7
-
8
-
9
-
10
-
11
-
12
-
13
-
14
-
15
-
16
-
17
-
18
-
19
-
20
-
21
-
22
-
23
-
24
-
25
-
26
-
27
-
28
-
29
-
30
-
31
-
32
-
33
-
34
-
35
-
36
-
37
-
38
-
39
-
40
-
41
-
42
-
43
-
44
-
45
-
46
-
47
-
 48
48 -
 49
49 -
 50
50 -
 51
51 -
 52
52 -
 53
53 -
 54
54 -
 55
55 -
 56
56 -
 57
57 -
 58
58 -
59
-
60
-
61
-
62
-
63
-
64
-
65
-
66
-
67
-
68
-
69
-
70
-
71
-
72
-
73
-
74
-
75
-
76
-
77
-
78
-
79
-
80
-
81
-
82
-
83
-
84
-
85
-
86
-
87
-
88
-
89
-
90
-
91
-
92
-
93
-
94
-
95
-
96
-
97
-
98
-
99
-
100
-
101
-
102
-
103
-
104
-
105
-
106
-
107
-
108
-
109
-
110
-
111
-
112
-
113
-
114
-
115
-
116
-
117
-
118
-
119
-
120
 |
 |

Chapter 3
Making a Good Thing Better
53
4
Position the carrier over the hard disk drive with the connectors at the rear.
5
Use the four screws on the carrier to attach the hard disk drive to the carrier.
Important:
If the printed circuit board is exposed on the bottom of the hard disk drive,
hold the drive by its sides. To avoid damaging the drive, don’t touch the printed circuit
board.
Connectors