Asus Crosshair II Formula User Manual - Page 178
Enabling GeForce, Boost and HybridPower™
 |
UPC - 610839160044
View all Asus Crosshair II Formula manuals
Add to My Manuals
Save this manual to your list of manuals |
Page 178 highlights
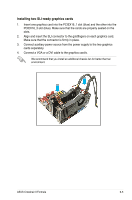
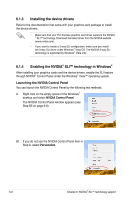
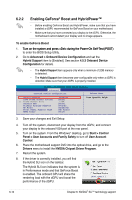
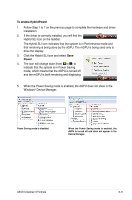
6.2.2 Enabling GeForce® Boost and HybridPower™ • Before enabling GeForce Boost and HybridPower, make sure that you have installed a dGPU recommended for GeForce Boost on your motherboard. • Make sure that you have connected your display to the dGPU. Otherwise, the motherboard cannot detect your display and no image appears. To enable GeForce Boost 1. ���T�u�r�n��o�n��th�e��s�y�s�t�e�m��a�n�d��p�r�e�s�s����d�u�r�in��g�t�h�e��P�o�w��e�r�-O��n��S�e�l�f-�T�e�s�t�(�P��O�S��T�) to enter the BIOS Setup Utility. 2. Go to Advanced > Onboard Device Configuration and set the Hybrid Support item to [Enabled]. See section 4.5.3 Onboard Device Configuration for details. • The Hybrid Support item appears only when a minimum of 2GB memory is detected. • The Hybrid Support item becomes user-configurable only when a dGPU is detected. Make sure that your dGPU is properly installed. Phoenix-AwardBIOS CMOS Setup Utility Advanced Onboard Device Configuration Select Menu Hybrid Support iGPU Frame Buffer Control x Frame Buffer Size Onboard GPU Primary Display Adapter HD Audio Front Panel Support Type HDMI Audio Enabled [Auto] 128M [Auto] [PCI-E] [Enabled] [HD Audio] [Auto] Item Specific Help 3. Save your changes and Exit Setup. 4. Turn off the system, disconnect your display from the dGPU, and connect your display to the onboard VGA port at the rear panel. 5. Turn on the system. From the Windows® desktop, go to Start > Control Panel > User Accounts and Family Safety to turn off User Account Control. 6. Place the motherboard support DVD into the optical drive, and go to the Drivers menu to install the NVIDIA Chipset Driver Program. 7. Restart the system. 8. If the driver is correctly installed, you will find the Hybrid SLI icon on the taskbar. The Hybrid SLI icon indicates that the system is in Performance mode and that GeForce Boost is enabled. The onboard GPU will share the rendering load with the dGPU and boost the performance of the dGPU. 6-10 Chapter 6: NVIDIA® SLI™ technology support
-
 1
1 -
2
-
3
-
4
-
5
-
6
-
7
-
8
-
9
-
10
-
11
-
12
-
13
-
14
-
15
-
16
-
17
-
18
-
19
-
20
-
21
-
22
-
23
-
24
-
25
-
26
-
27
-
28
-
29
-
30
-
31
-
32
-
33
-
34
-
35
-
36
-
37
-
38
-
39
-
40
-
41
-
42
-
43
-
44
-
45
-
46
-
47
-
48
-
49
-
50
-
51
-
52
-
53
-
54
-
55
-
56
-
57
-
58
-
59
-
60
-
61
-
62
-
63
-
64
-
65
-
66
-
67
-
68
-
69
-
70
-
71
-
72
-
73
-
74
-
75
-
76
-
77
-
78
-
79
-
80
-
81
-
82
-
83
-
84
-
85
-
86
-
87
-
88
-
89
-
90
-
91
-
92
-
93
-
94
-
95
-
96
-
97
-
98
-
99
-
100
-
101
-
102
-
103
-
104
-
105
-
106
-
107
-
108
-
109
-
110
-
111
-
112
-
113
-
114
-
115
-
116
-
117
-
118
-
119
-
120
-
121
-
122
-
123
-
124
-
125
-
126
-
127
-
128
-
129
-
130
-
131
-
132
-
133
-
134
-
135
-
136
-
137
-
138
-
139
-
140
-
141
-
142
-
143
-
144
-
145
-
146
-
147
-
148
-
149
-
150
-
151
-
152
-
153
-
154
-
155
-
156
-
157
-
158
-
159
-
160
-
161
-
162
-
163
-
164
-
165
-
166
-
167
-
168
-
169
-
170
-
171
-
172
-
 173
173 -
 174
174 -
 175
175 -
 176
176 -
 177
177 -
 178
178 -
 179
179 -
 180
180 -
 181
181 -
 182
182 -
 183
183 -
184
-
185
-
186
 |
 |