Asus M4A78T-E User Manual - Page 100
ASUS Express Gate SSD / ASUS Express Gate
 |
UPC - 610839169559
View all Asus M4A78T-E manuals
Add to My Manuals
Save this manual to your list of manuals |
Page 100 highlights
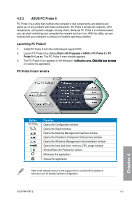
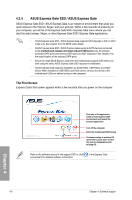
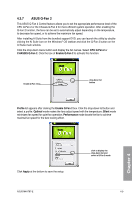
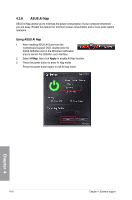
4.3.4 ASUS Express Gate SSD / ASUS Express Gate ASUS Express Gate SSD / ASUS Express Gate is an instant-on environment that gives you quick access to the Internet, Skype, and your pictures. Within a few seconds of powering on your computer, you will be at the Express Gate SSD / Express Gate menu where you can start the web browser, Skype, or other Express Gate SSD / Express Gate applications. • ASUS Express Gate SSD / ASUS Expess Gate supports SATA devices in IDE or SATA mode only. See chapter 3 for the BIOS setup details. • ASUS Express Gate SSD / ASUS Express Gate supports SATA devices connected to the motherboard chipset-controlled onboard SATA ports only. All onboard extended SATA ports and external SATA ports are NOT supported. See chapter 2 for the exact location of the onboard SATA ports. • Ensure to install ASUS Express Gate from the motherboard support DVD before you start using the utility. ASUS Express Gate SSD requires no installation. • ASUS Express Gate supports installation on SATA HDDs, USB HDDs, and Flash drives. When installed on USB HDDs and Flash drives, connect the drives to the motherboard USB port before turning on the computer. The First Screen Express Gate's first screen appears within a few seconds after you power on the computer. Click any of the application icons to enter Express Gate environment and launch the selected application Turn off the computer Enter the motherboard BIOS setup Continue booting to existing OS when timer counts down to zero (0); click to immediately enter existing OS Refer to the software manual in the support DVD or click environment for detailed software instructions. in the Express Gate Chapter 4 4-6 Chapter 4: Software support
-
 1
1 -
2
-
3
-
4
-
5
-
6
-
7
-
8
-
9
-
10
-
11
-
12
-
13
-
14
-
15
-
16
-
17
-
18
-
19
-
20
-
21
-
22
-
23
-
24
-
25
-
26
-
27
-
28
-
29
-
30
-
31
-
32
-
33
-
34
-
35
-
36
-
37
-
38
-
39
-
40
-
41
-
42
-
43
-
44
-
45
-
46
-
47
-
48
-
49
-
50
-
51
-
52
-
53
-
54
-
55
-
56
-
57
-
58
-
59
-
60
-
61
-
62
-
63
-
64
-
65
-
66
-
67
-
68
-
69
-
70
-
71
-
72
-
73
-
74
-
75
-
76
-
77
-
78
-
79
-
80
-
81
-
82
-
83
-
84
-
85
-
86
-
87
-
88
-
89
-
90
-
91
-
92
-
93
-
94
-
 95
95 -
 96
96 -
 97
97 -
 98
98 -
 99
99 -
 100
100 -
 101
101 -
 102
102 -
 103
103 -
 104
104 -
 105
105 -
106
-
107
-
108
-
109
-
110
-
111
-
112
-
113
-
114
-
115
-
116
-
117
-
118
-
119
-
120
-
121
-
122
 |
 |
