Asus ZenFone 4 Pro ZS551KL User Guide - Page 9
Installing a nano SIM card / memory card
 |
View all Asus ZenFone 4 Pro ZS551KL manuals
Add to My Manuals
Save this manual to your list of manuals |
Page 9 highlights
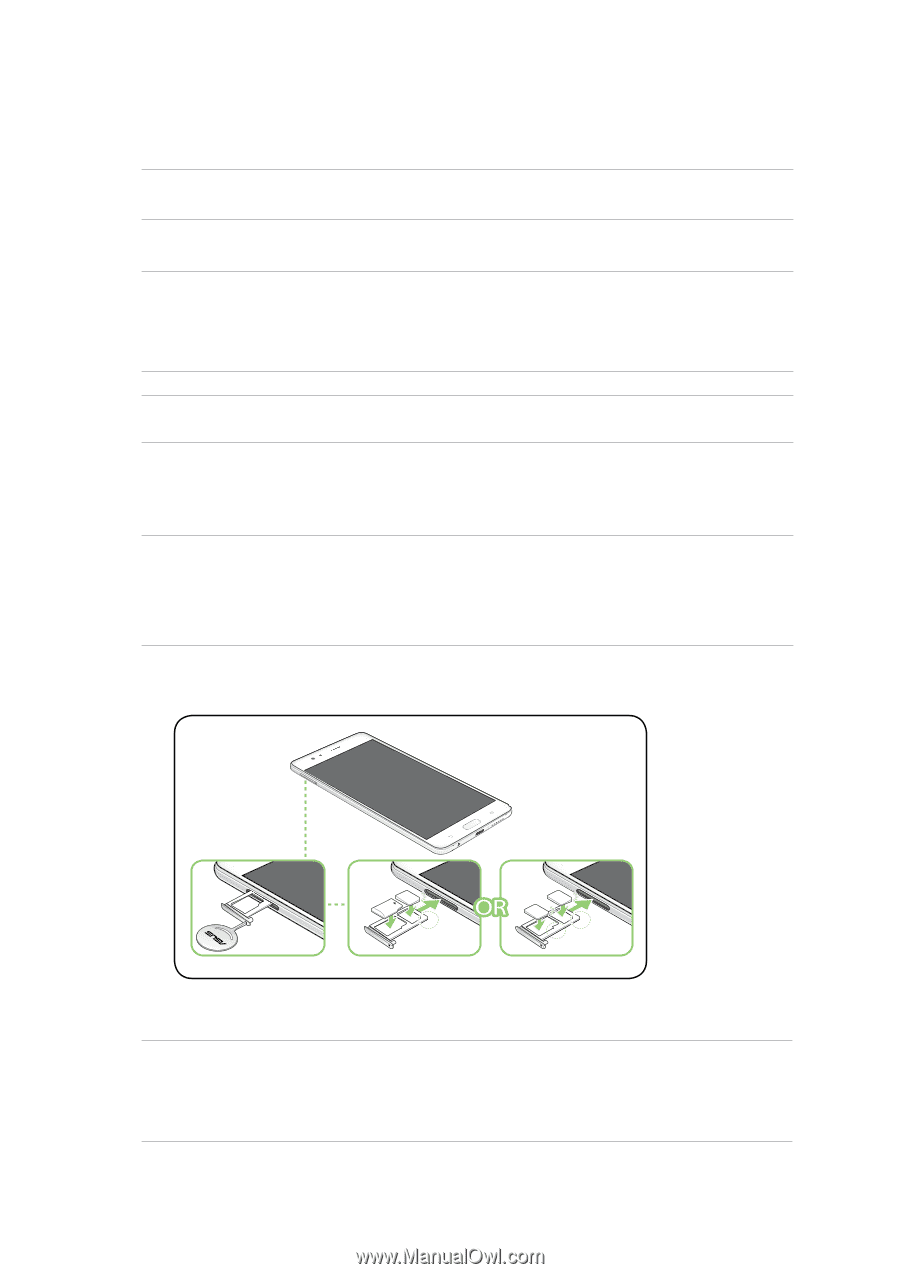
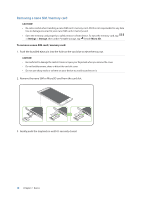
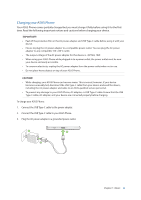
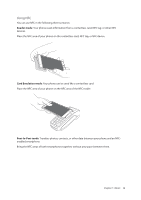
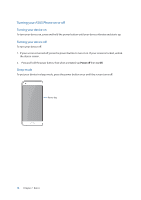
Installing a nano SIM card / memory card Your nano SIM card slots support GSM, WCDMA, FDD-LTE, and TDD-LTE network bands. NOTE: To prevent connector damage, ensure to use a standard nano SIM card without a SIM adapter or the use of a cutter. Your ASUS Phone supports a microSD™ and microSDXC™ memory card with up to 2 TB capacity. NOTES: • Some memory cards may not be compatible with your ASUS Phone. Ensure that you use only compatible memory cards to prevent loss of data, damage to your device, or memory card, or both. • The microSD card is sold separately. CAUTION! Be extra careful when handling a nano SIM card / memory card. ASUS is not responsible for any data loss or damage incurred to your nano SIM cards / memory card. To install a Nano SIM card / memory card: 1. Push the bundled eject pin into the hole on the card slot to eject the tray out. CAUTION! • Be careful not to damage the card slot cover or injure your fingernails when you remove the cover. • Do not forcibly remove, shear, or distort the card slot cover. • Do not use sharp tools or solvent on your device to avoid scratches on it. 2. Insert the Nano SIM or microSD card into the appropriate slot. Micro SD Nano-SIM1 Nano-SIM2 Nano-SIM1 3. Gently push the tray back in until it's securely closed. IMPORTANT! • You can only use the Nano SIM2 card or the MicroSD card at a time. • When two SIM cards are inserted, only one SIM card slot supports 4G/3G/2G service. The other SIM card slot only supports 2G/3G service. Chapter 1: Basics 9
-
 1
1 -
2
-
3
-
 4
4 -
 5
5 -
 6
6 -
 7
7 -
 8
8 -
 9
9 -
 10
10 -
 11
11 -
 12
12 -
 13
13 -
 14
14 -
15
-
16
-
17
-
18
-
19
-
20
-
21
-
22
-
23
-
24
-
25
-
26
-
27
-
28
-
29
-
30
-
31
-
32
-
33
-
34
-
35
-
36
-
37
-
38
-
39
-
40
-
41
-
42
-
43
-
44
-
45
-
46
-
47
-
48
-
49
-
50
-
51
-
52
-
53
-
54
-
55
-
56
-
57
-
58
-
59
-
60
-
61
-
62
-
63
-
64
-
65
-
66
-
67
-
68
-
69
-
70
-
71
-
72
-
73
-
74
-
75
-
76
-
77
-
78
-
79
-
80
-
81
-
82
-
83
-
84
-
85
-
86
-
87
-
88
-
89
-
90
-
91
-
92
-
93
-
94
-
95
-
96
-
97
 |
 |