BenQ SP870 SP870 User Manual - Page 10
Remote control, Using the On-Screen Display OSD menus - tested projector
 |
UPC - 840046019181
View all BenQ SP870 manuals
Add to My Manuals
Save this manual to your list of manuals |
Page 10 highlights
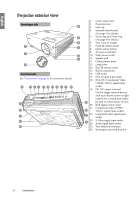
English Remote control For details, see the info. provided behind the 1 hand sign . 2 13 8. MENU/EXIT 3 14 Turns on the On-Screen Display (OSD) menu. 4 Goes back to previous OSD menu, exits and saves 5 6 15 menu settings. 7 16 "Using the On-Screen Display (OSD) menus" 8 17 on page 23 9 18 9. Left/ 10 19 Starts the FAQ function. 18 "Utilizing FAQ function" on page 35 11 20 10. ENTER 12 21 Activates the selected On-Screen Display (OSD) 22 menu item. 11. BLANK Used to hide the screen image. "Hiding the image" on page 35 12. VOLUME+/VOLUMEAdjusts the sound level. 1. FREEZE Freezes the projected image. "Freezing the image" on page 35 2. ASPECT Selects the display aspect ratio. "Adjusting the sound" on page 37 13. II POWER Toggles the projector between standby mode and on. "Starting up the projector" on page 22, "Shutting down the projector" on page 38 "Selecting the aspect ratio" on page 29 14. DIGITAL ZOOM+/DIGITAL ZOOM- 3. CAPTURE Magnifies or reduces the projected image size. (This function is not available with this model.) 4. BRIGHTNESS "Magnifying and searching for details" on page 28 Adjusts brightness. "Adjusting Brightness" on page 31 5. CONTRAST 15. TIMER ON Activates or displays an on-screen timer based on your own timer setting. Adjusts contrast. "Setting the presentation timer" on page 33 "Adjusting Contrast" on page 31 16. TIMER SET UP 6. TEST PATTERN Enters presentation timer setting directly. (This function is not available with this model.) "Setting the presentation timer" on page 33 7. LASER 17. AUTO Emits visible laser pointer light for presentation purposes. Automatically determines the best picture timings for the displayed image. "Operating the LASER pointer" on page 11 "Auto-adjusting the image" on page 27 10 Introduction
-
 1
1 -
2
-
3
-
4
-
 5
5 -
 6
6 -
 7
7 -
 8
8 -
 9
9 -
 10
10 -
 11
11 -
 12
12 -
 13
13 -
 14
14 -
 15
15 -
16
-
17
-
18
-
19
-
20
-
21
-
22
-
23
-
24
-
25
-
26
-
27
-
28
-
29
-
30
-
31
-
32
-
33
-
34
-
35
-
36
-
37
-
38
-
39
-
40
-
41
-
42
-
43
-
44
-
45
-
46
-
47
-
48
-
49
-
50
-
51
-
52
-
53
-
54
 |
 |
