BenQ SP870 SP870 User Manual - Page 41
Description of each menu, DISPLAY menu, PICTURE menu
 |
UPC - 840046019181
View all BenQ SP870 manuals
Add to My Manuals
Save this manual to your list of manuals |
Page 41 highlights
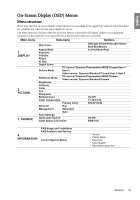
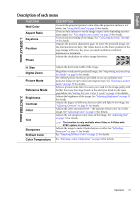
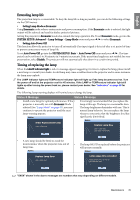
English 1. DISPLAY menu Description of each menu FUNCTION Wall Color Aspect Ratio Keystone Position Phase DESCRIPTION Corrects the projected picture's color when the projection surface is not white. See "Using Wall Color" on page 30 for details. There are four options to set the image's aspect ratio depending on your input signal. See "Selecting the aspect ratio" on page 29 for details. Corrects any keystoning of the image. See "Correcting keystone" on page 28 for details. Displays the position adjustment page. To move the projected image, use the directional arrow keys. The values shown on the lower position of the page change with every key press you made until they reach their maximum or minimum. Adjusts the clock phase to reduce image distortion. 2. PICTURE menu H. Size Digital Zoom Picture Mode Reference Mode Brightness Contrast Color Tint Sharpness Brilliant Color Color Temperature Adjusts the horizontal width of the image. Magnifies or reduces the projected image. See "Magnifying and searching for details" on page 28 for details. Pre-defined picture modes are provided so you can optimize your projector image set-up to suit your program type. See "Selecting a picture mode" on page 30 for details. Selects a picture mode that most suits your need for the image quality and further fine-tune the image based on the selections listed on the same page below. See "Setting the User 1/User 2 mode" on page 31 for details. Adjusts the brightness of the image. See "Adjusting Brightness" on page 31 for details. Adjusts the degree of difference between dark and light in the image. See "Adjusting Contrast" on page 31 for details. Adjusts the color saturation level -- the amount of each color in a video image. See "Adjusting Color" on page 31 for details. Adjusts the red and green color tones of the image. See "Adjusting Tint" on page 31 for details. The function is only available when Video or S-Video with NTSC system is selected. Adjusts the image to make it look sharper or softer. See "Adjusting Sharpness" on page 31 for details. See "Adjusting Brilliant Color" on page 32 for details. See "Selecting a color temperature" on page 32 for details. Operation 41
-
 1
1 -
2
-
3
-
4
-
5
-
6
-
7
-
8
-
9
-
10
-
11
-
12
-
13
-
14
-
15
-
16
-
17
-
18
-
19
-
20
-
21
-
22
-
23
-
24
-
25
-
26
-
27
-
28
-
29
-
30
-
31
-
32
-
33
-
34
-
35
-
 36
36 -
 37
37 -
 38
38 -
 39
39 -
 40
40 -
 41
41 -
 42
42 -
 43
43 -
 44
44 -
 45
45 -
 46
46 -
47
-
48
-
49
-
50
-
51
-
52
-
53
-
54
 |
 |
