BenQ WDC10 User Manual - Page 17
Assembling the adapter, The adapter is successfully assembled when it clips into place.
 |
View all BenQ WDC10 manuals
Add to My Manuals
Save this manual to your list of manuals |
Page 17 highlights
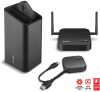
Assembling the adapter Every InstaShow™ adapter provided in the box includes a plug socket and plugs based on the region in which you purchased InstaShow™. Below are images of the standard American, standard European, and standard British plugs: Standard American Standard British Standard European To connect the plug of your choice, follow the steps below. 1. Align and insert the bottom hook to the adapter. 2. Close the gap by pushing the plug. 3. The adapter is successfully assembled when it clips into place. OPEN 3 PUSH 1 2 LOCK LOCK To disconnect the plug, follow the steps below. 1 OPEN 2 1. Push the latch in the middle. 2. Open the gap by pulling the gap downwards. Installation 17
-
 1
1 -
2
-
3
-
4
-
5
-
6
-
7
-
8
-
9
-
10
-
11
-
 12
12 -
 13
13 -
 14
14 -
 15
15 -
 16
16 -
 17
17 -
 18
18 -
 19
19 -
 20
20 -
 21
21 -
 22
22 -
23
-
24
-
25
-
26
-
27
-
28
-
29
-
30
-
31
-
32
-
33
-
34
-
35
-
36
-
37
-
38
-
39
-
40
-
41
-
42
-
43
-
44
-
45
-
46
-
47
-
48
-
49
-
50
-
51
-
52
-
53
-
54
-
55
-
56
-
57
-
58
-
59
-
60
-
61
-
62
-
63
 |
 |

17
Installation
Assembling the adapter
Every InstaShow™ adapter provided in the box includes a plug socket and plugs based on the region
in which you purchased InstaShow™. Below are images of the standard American, standard
European, and standard British plugs:
To connect the plug of your choice, follow the steps below.
1.
Align and insert the bottom hook to the adapter.
2.
Close the gap by pushing the plug.
3.
The adapter is successfully assembled when it clips into place.
To disconnect the plug, follow the steps below.
1.
Push the latch in the middle.
2.
Open the gap by pulling the gap downwards.
Standard British
Standard European
Standard American
1
2
PUSH
OPEN
LOCK
3
1
OPEN
LOCK
2