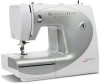
Bernina Bernette 56 Instruction Manual - Page 14
Gebruik, Naaimachine
 |
View all Bernina Bernette 56 manuals
Add to My Manuals
Save this manual to your list of manuals |
Page 14 highlights
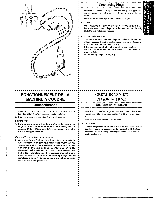
j : •• Connecting Plugs ••• 1. Insert the foot controller plug, located between the foot controller • and the power supply plug on the cord, into the jack on the ma• chine . •• 2. Insert the power supply plug into an electrical outlet •• CAUTION: • 1. When changing the light bulb or when the sewing machine is not •• in use, the power supply plug must be disconnected from the walt • socket to avoid electrical hazards. ••• (for U.S.A. and Canada only) • 2. This appliance has a polarized plug (one blade is wider than the • other). To reduce the risk of electric shock, this plug is intended to •• fit in a polarized outlet in only one way. • If the plug does not fit fully in the outlet, reverse the plug. • If it still does not fit, contact a qualified electrician to install the • proper outlet• •• Do not modify the plug in any way. ••••F•O•MN•A•C•CT•IH•OI•NN•EN••EA•M•C•EO•N•UT•D•D•RE•E•L•A G•N•E•AB•AR••IUM•I•KA•C•V•HA•NI•N•DE•E Raccordement ••• 1. Brancher Ia fiche qui se trouve sur !e cordon d'a!imentation entre • Ia pedale et Ia fiche d'alimentation dans Ia machine. •• a 2. Brancher Ia fiche d'alimentation une prise secteur. • PRECAUTION: •• 1. Lors du remplacement de !'ampoule, de Ia canette, de • l'alguille ou lorsque Ia machine n'est pas utilisee, i1 est re• commande de Ia d6brancher de Ia prise secteur pour eviter •• toute decharge etectrique. •• (Pour les E.-U. et le Canada uniquement) •• 2. Cette machine est equipee d'une fiche polarisee, c'est-8-dire • qu'elle possede une lame plus grande que !'autre. Par me• sure de securite, il n'est possible d'introduire Ia fiche dans •• une prise de courant que d'une seule fac;on. Si I'on ne par• a vient pas 8 inserer Ia fiche fond dans Ia prise, essayer dans • !'autre sens. Si malgre cela, il est toujours impossible de Ia •• brancher, veuillez contacter un etectricien pour qu'il vienne • remplacer Ia prise. Ne jamais passer outre cette mesure de • securite des fiches polarisees. Stekkers en contacten J. Steek de stekker van het voetpedaal in de aansluiting in de machine. Deze stekker zit tussen bet voetpedaal en de stekker voor het stopcontact. 2. Steck nude (stroom) stekker in het stopcontact. VOORZICHTIG: 1. U wordt aangeraden o~ bij bet wisselen van een naald~ spoel of lampje of wanneer de naaimachine niet wordt gebruikt, de stekk;er uit bet stopcontact te verwijderen om gevaar voor elektrische scbokM ken te voorkomen• 6
-
 1
1 -
2
-
3
-
4
-
5
-
6
-
7
-
8
-
 9
9 -
 10
10 -
 11
11 -
 12
12 -
 13
13 -
 14
14 -
 15
15 -
 16
16 -
 17
17 -
 18
18 -
 19
19 -
20
-
21
-
22
-
23
-
24
-
25
-
26
-
27
-
28
-
29
-
30
-
31
-
32
-
33
-
34
-
35
-
36
-
37
-
38
-
39
-
40
-
41
-
42
-
43
-
44
-
45
-
46
-
47
-
48
-
49
-
50
-
51
-
52
-
53
-
54
-
55
-
56
-
57
-
58
-
59
-
60
-
61
-
62
-
63
-
64
-
65
-
66
-
67
-
68
-
69
-
70
-
71
-
72
-
73
-
74
-
75
-
76
-
77
-
78
-
79
-
80
-
81
-
82
-
83
-
84
-
85
-
86
 |
 |
