Bernina Bernette 56 Instruction Manual - Page 37
lower, Threading - how to thread bobbin on
 |
View all Bernina Bernette 56 manuals
Add to My Manuals
Save this manual to your list of manuals |
Page 37 highlights
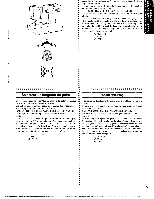
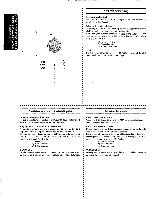
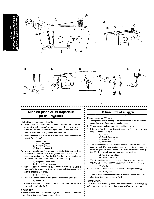
A B-2 8-3 c lower Threading Turn power switch to "0" . 1. Raise the needle to its highest position by turning the balance wheel toward you (counterclockwise) and raise the presser foot !ever. 2. Open the shuttle cover behind the extension table on the front of the machine and remove the bobbin case by pulling its latch toward you and pulling it out from the shuttle race (fig. A) . 3. Unwind about 10 em (4'') of thread from a full bobbin and insert the bobbin into the bobbin case. (See fig. 8-1.) Pull the trailing thread into the slot, then down and to the left, as shown in fig. B-2, until it enters the delivery eye under the tension spring (fig. B-3) . 4. Holding the bobbin case by the latch, fully insert the bobbin case into the shuttle race and release the latch. Make sure the bobbin case finger fits into the notch at the top of the race as shown in fig. c. NOTE: If the bobbin case is not properly placed back into the m.;tchine, it will fall out from the shuttle immediately after starting to sew. CD Bobbin case latch ® Bobbin case finger @ Tension spring @ Notch Mise en place du fil inferieur De onderdraad aanbrengen Mettre !'interrupteur principal sur "0". 1. Remonter comp19tement l'aiguille en tournant le volant vers soi (dans le sens oppose aux aigui!!es d'une montre) et relever le levier du pied-de,biche. 2. Ouvrir le couvercle de Ia navette, derriere !a table d'extension, a I'avant de Ia machine, et retirer Je bonier de Ia canette en tirant Ia Hoofdschakelaar op "0'' zetten. I. Draai de naald in de hoogste positie door bet handwiel naar u toe (linksom) te draaien en zet de persvoethetboom omhoog. 2. Open de spoelhuisklep achter bet afneembare vakje aan de voorkant van.de machine en verwijder bet spoelhuis door het geheel aan het hendeltje naar u toe uit de spoelbaan te trekken (fig. A). languette metal!ique vers soi pour le sortir de Ia coursiere. (fig. A) 3. Draai ongeveer 10 em draad van de valle spoel af, en plaats de spoel in bet spoelhuis. (Zie fig. B-1.) Trek bet Joshangende stukje draad door de 3. D€vider environ 10 em de fil de Ia canette pleine et ins9rer Ia sleuf, naar onder en naar links zoals in fig. B-2 afgebeeld is, tot in het canette dans le boitier. (Voir fig. 6~1.) Faire passer le fil qui de- geleidingsoog onder het drukveertje (fig. B-3). passe dans Ia fente, en bas et vers Ia gauche, comme illustre sur 4. Trek bet hendeltje uit en plaats bet spoelhuis met spoel in de spoelbaan. Ia fig. 8~2, jusqu'a ce qu'i! s'insere dans !'orifice de sortie sous !e Laat het hendeltje weer los, waarbij u moet zorgen dat de metalen positie~ ressort de tension (fig. 8-3). vinger van het spoelhuis irt-de uitsparing bovenin de spoelbaan komt te a 4. Tout en tenant le bo!tier par le loquet meta!lique, l'enfoncer fond liggen, zoals getoond in fig. C hieronder. a dans Ia navette et relacher Ia languette metallique. Bien veiller ce que Ia languette metamque du boitier s'introduise dans I'encoche en haut de Ia glissiSre, com me le montre Ia fig. C ci-dessous. REMAROUE: Si Je boitier n'est pas place correctement, il va s'€chapperde Ia na- a vette des qu'on commence coudre.
-
 1
1 -
2
-
3
-
4
-
5
-
6
-
7
-
8
-
9
-
10
-
11
-
12
-
13
-
14
-
15
-
16
-
17
-
18
-
19
-
20
-
21
-
22
-
23
-
24
-
25
-
26
-
27
-
28
-
29
-
30
-
31
-
 32
32 -
 33
33 -
 34
34 -
 35
35 -
 36
36 -
 37
37 -
 38
38 -
 39
39 -
 40
40 -
 41
41 -
 42
42 -
43
-
44
-
45
-
46
-
47
-
48
-
49
-
50
-
51
-
52
-
53
-
54
-
55
-
56
-
57
-
58
-
59
-
60
-
61
-
62
-
63
-
64
-
65
-
66
-
67
-
68
-
69
-
70
-
71
-
72
-
73
-
74
-
75
-
76
-
77
-
78
-
79
-
80
-
81
-
82
-
83
-
84
-
85
-
86
 |
 |
