Bernina Bernette 56 Instruction Manual - Page 42
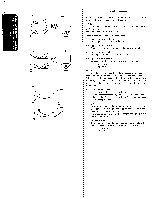
Quick, Thread-setting System, START, BOBBIN 75 only, Vlug draadinlegsysteem Vlug systeem, aileen bij
 |
View all Bernina Bernette 56 manuals
Add to My Manuals
Save this manual to your list of manuals |
Page 42 highlights
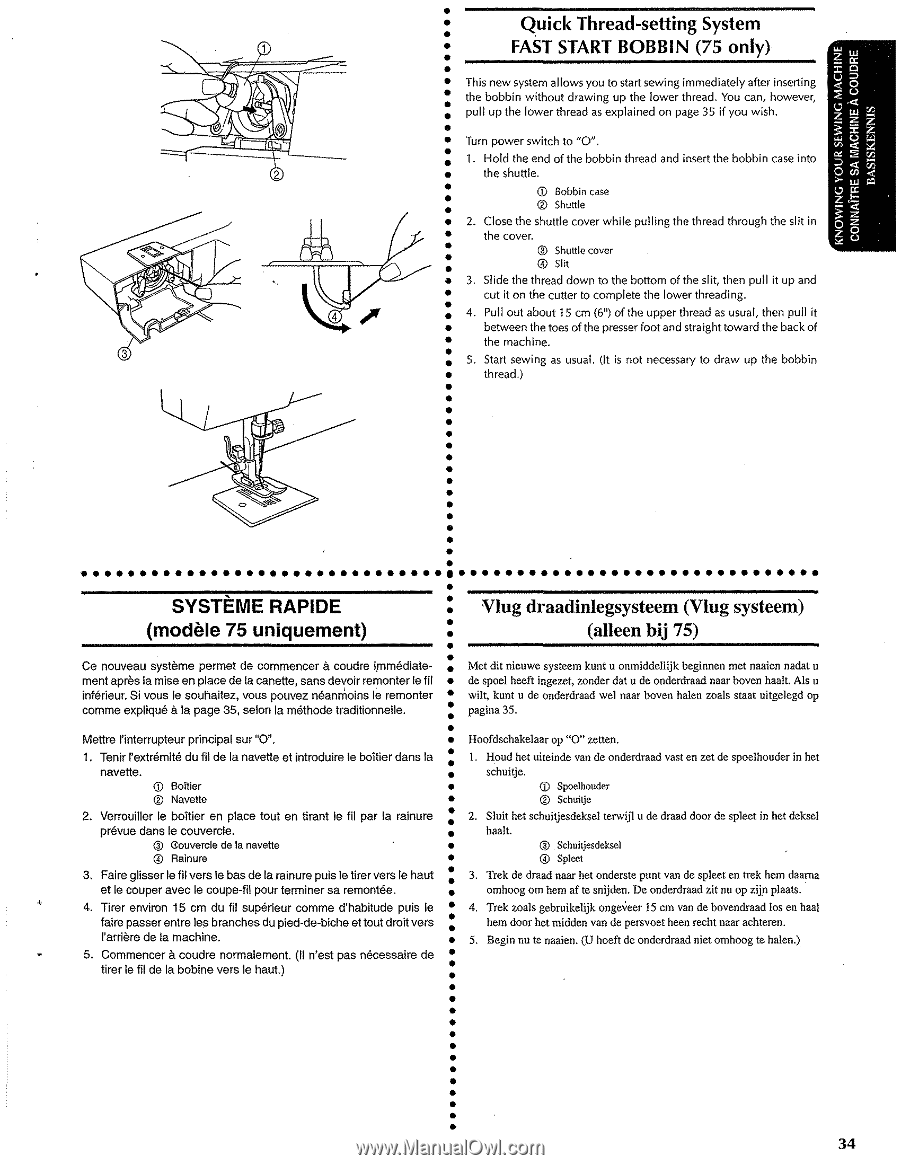
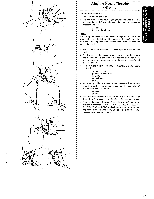
Quick Thread-setting System FAST START BOBBIN (75 only) This new system allows you to start sewing immediately after inserting the bobbin without drawing up the lower thread. You can, however, pull up the lower thread as explained on page 35 if you wish . Turn power switch to "0". 1. Hold the end of the bobbin thread and insert the bobbin case into the shuttle. CD Bobbin case ® Shuttle 2. Close the shuttle cover while pulling the thread through the slit in the cover. ® Shuttle cover @Slit 3. Slide the thread down to the bottom of the slit, then pull it up and • cut it on the cutter to complete the lower threading . • 4. Pull out about 15 em {6 11 ) of the upper thread as usual, then pull it • between the toes of the presser foot and straight toward the back of ~" •• the machine. • 5. Start sewing as usual. Ot is not necessary to draw up the bobbin • thread.) SYSTEME RAPIDE •• (modele 75 uniquement) a ••• Ce nouveau systeme permet de commencer coudre i.mm8diate- • ment aprSs Ia mise en place de !a canette, sans devoir remonter !e fit •• infSrieur. Si vous le souhaitez, vous pouvez neanffioins 16 remonter a • comme explique !a page 35, selon Ia methode traditionne!le. •• Mettre l'interrupteur principal sur "0". •• 1. Tenir l'extrSmite du fi! de Ia navette et introduire le boitier dans !a • navette. •
-
 1
1 -
2
-
3
-
4
-
5
-
6
-
7
-
8
-
9
-
10
-
11
-
12
-
13
-
14
-
15
-
16
-
17
-
18
-
19
-
20
-
21
-
22
-
23
-
24
-
25
-
26
-
27
-
28
-
29
-
30
-
31
-
32
-
33
-
34
-
35
-
36
-
 37
37 -
 38
38 -
 39
39 -
 40
40 -
 41
41 -
 42
42 -
 43
43 -
 44
44 -
 45
45 -
 46
46 -
 47
47 -
48
-
49
-
50
-
51
-
52
-
53
-
54
-
55
-
56
-
57
-
58
-
59
-
60
-
61
-
62
-
63
-
64
-
65
-
66
-
67
-
68
-
69
-
70
-
71
-
72
-
73
-
74
-
75
-
76
-
77
-
78
-
79
-
80
-
81
-
82
-
83
-
84
-
85
-
86
 |
 |