Bernina Bernette 56 Instruction Manual - Page 38
Upper Needle Threading - spool pin
 |
View all Bernina Bernette 56 manuals
Add to My Manuals
Save this manual to your list of manuals |
Page 38 highlights
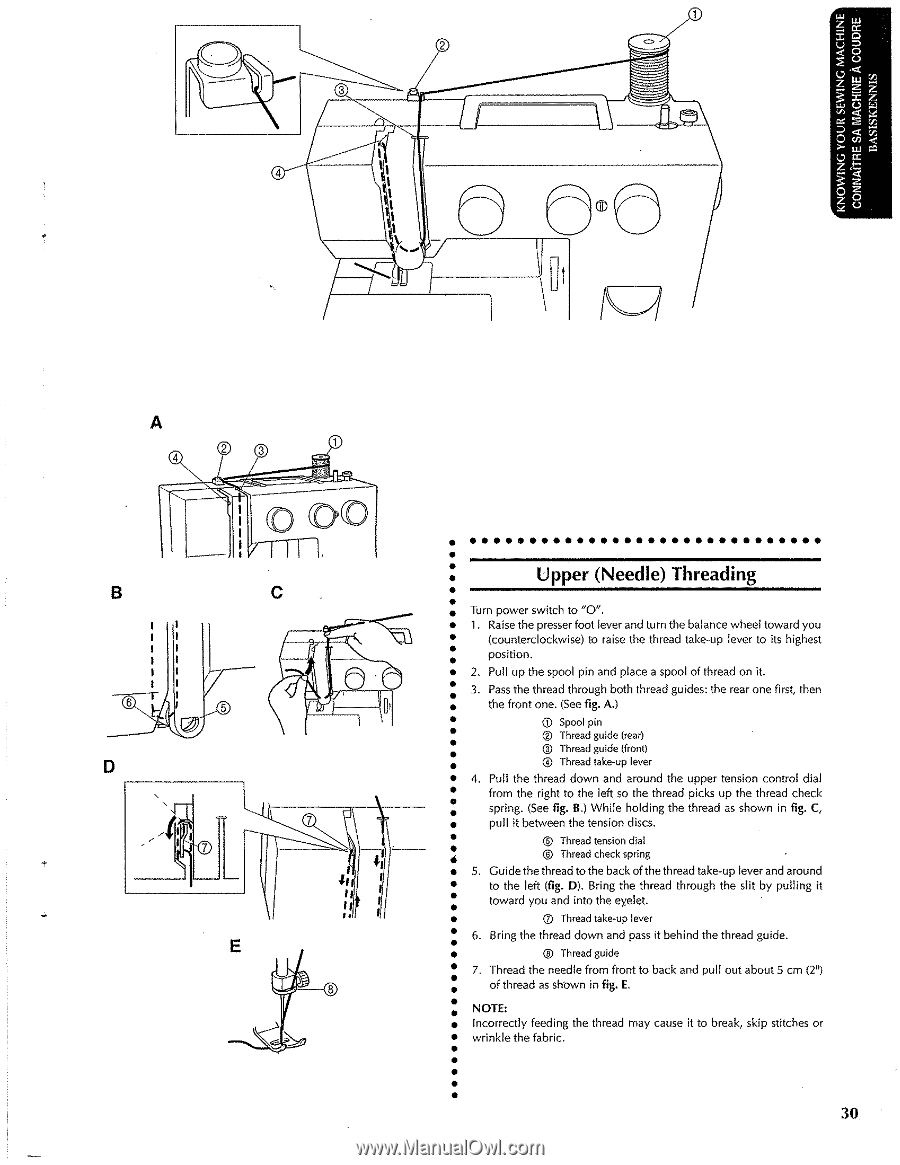
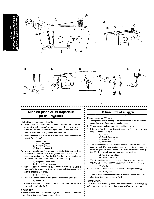
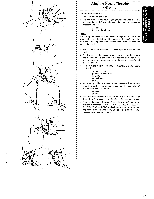
A 8 D ' ' c ••• • Upper (Needle) Threading • ••• • Turn power switch to "0". 1. Raise the presser foot lever and turn the balance wheel toward you (counterclockwise) to raise the .thread take-up lever to its highest position. 2. Pull up the spool pin and place a spool of thread on it. 3. Pass the thread through both thread guides: the rear one first, then the front one. (See fig. A.) ."."I II ~ -I I I I CD Spool pin ® Thread guide (rear) • @ Thread guide (front) • @ Thread take-up lever • 4. Pull the thread down and around the upper tension control dial •• from the right to the left so the thread picks up the thread check • spring. (See fig. B.) While holding the thread as shown in fig. C, • pull it between the tension discs. •• ® Thread tension dial • ® Thread check spring • 5. Guide the thread to the back of the thread take-up lever and around •• to the left (fig. 0). Bring the thread through the slit by pulling it toward you and into the ey,elet. CV Thread take-up lever 6. Bring the thread down and pass it behind the thread guide. ® Thread guide 7. Thread the needle from front to back and pull out about 5 em (2 11 ) of thread as shbwn in fig. E. NOTE: Incorrectly feeding the thread may cause it to break, skip stitches or wrinkle the fabric. 30
-
 1
1 -
2
-
3
-
4
-
5
-
6
-
7
-
8
-
9
-
10
-
11
-
12
-
13
-
14
-
15
-
16
-
17
-
18
-
19
-
20
-
21
-
22
-
23
-
24
-
25
-
26
-
27
-
28
-
29
-
30
-
31
-
32
-
 33
33 -
 34
34 -
 35
35 -
 36
36 -
 37
37 -
 38
38 -
 39
39 -
 40
40 -
 41
41 -
 42
42 -
 43
43 -
44
-
45
-
46
-
47
-
48
-
49
-
50
-
51
-
52
-
53
-
54
-
55
-
56
-
57
-
58
-
59
-
60
-
61
-
62
-
63
-
64
-
65
-
66
-
67
-
68
-
69
-
70
-
71
-
72
-
73
-
74
-
75
-
76
-
77
-
78
-
79
-
80
-
81
-
82
-
83
-
84
-
85
-
86
 |
 |