Bosch HBL8651UC Instructions for Use - Page 9
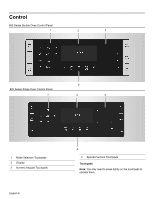
Telescopic Rack, To insert the telescopic rack into the oven, To remove the telescopic rack from - wall oven
 |
View all Bosch HBL8651UC manuals
Add to My Manuals
Save this manual to your list of manuals |
Page 9 highlights
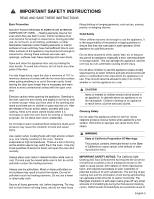
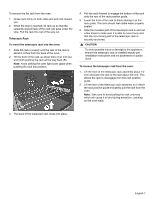
To remove the flat rack from the oven: 1. Grasp rack firmly on both sides and pull rack toward you. 2. When the stop is reached, tilt rack up so that the upwardly sloped back of the rack can pass under the stop. Pull the rack the rest of the way out. Telescopic Rack To insert the telescopic rack into the oven: 1. Slide the rack in evenly until the rear of the rack is about 2 inches from the back of the oven. 2. Tilt the front of the rack up about 3/4's of an inch (A) and finish pushing the rack all the way back (B). Note: Avoid striking the oven light cover glass when pushing the rack into position. 4. Pull the rack forward to engage the bottom of the rack onto the rear of the rack position guide. 5. Lower the front of the rack to finish seating it on the rack guide. The rack should feel stable when properly seated. 6. Slide the movable part of the telescopic rack in and out a few times to make sure it is able to move freely and that the non-moving part of the telescopic rack is securely anchored. 9 CAUTION To avoid possible injury or damage to the appliance, ensure the telescopic rack is installed exactly per installation instructions and not backwards or upside down. To remove the telescopic rack from the oven: 1. Lift the front of the telescopic rack assembly about 1/2 inch and push the rack to the rear about 3/4 inch. This allows the rack to disengage from the rack position guide. 2. Lift the rear of the telescopic rack assembly so it clears the rack position guide and gently pull the rack from the oven. Note: Take care to avoid pulling the rack unevenly which will cause it to bind during extraction, catching on the oven walls. 3. The back of the telescopic rack drops into place. English 7
-
 1
1 -
2
-
3
-
 4
4 -
 5
5 -
 6
6 -
 7
7 -
 8
8 -
 9
9 -
 10
10 -
 11
11 -
 12
12 -
 13
13 -
 14
14 -
15
-
16
-
17
-
18
-
19
-
20
-
21
-
22
-
23
-
24
-
25
-
26
-
27
-
28
-
29
-
30
-
31
-
32
-
33
-
34
-
35
-
36
-
37
-
38
-
39
-
40
-
41
-
42
-
43
-
44
-
45
-
46
-
47
-
48
-
49
-
50
-
51
-
52
-
53
-
54
-
55
-
56
-
57
-
58
-
59
-
60
-
61
-
62
-
63
-
64
-
65
-
66
-
67
-
68
-
69
-
70
-
71
-
72
-
73
-
74
-
75
-
76
-
77
-
78
-
79
-
80
 |
 |