Bosch WTVC6330US User Manual - Page 10
raised glass - 11
 |
UPC - 825225882800
View all Bosch WTVC6330US manuals
Add to My Manuals
Save this manual to your list of manuals |
Page 10 highlights
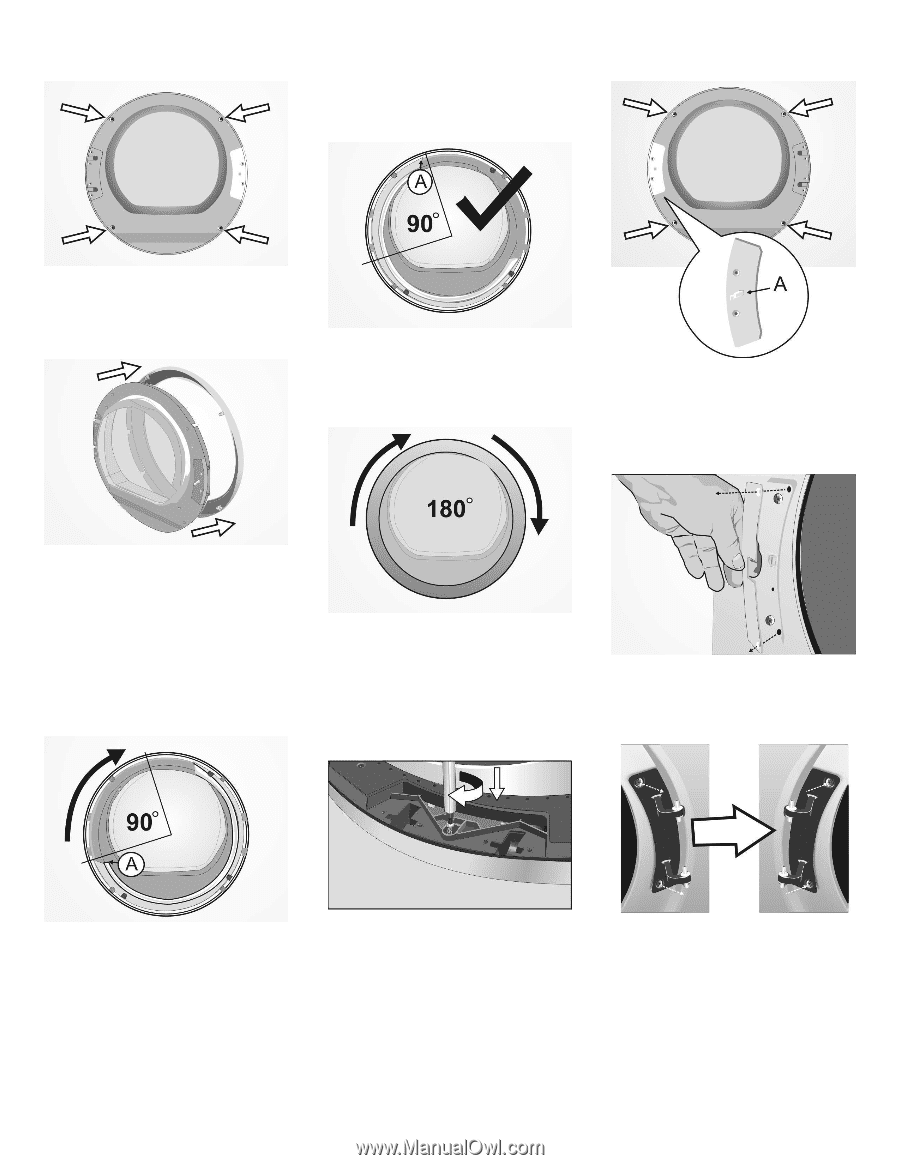
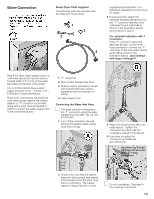
9. Remove the four screws holding the front ring to the door body. 13. Note the new position of the cover glass. The leading edge of the raised glass edge should have moved 90 degrees clockwise from its starting point as shown in the illustration below as (A). 19. Reinsert and tighten the four front ring screws. 10. Flip the door over so the front ring faces up. 11. Remove the front ring from the dryer door. 14. Rotate the front ring 180 degrees so the door handle is now on the right hand side. The door handle is located on the inside of the front ring. It is a hand-sized indent. 20. Remove the two screws holding the plastic cover plate over the left hand hinge mounting position on the dryer housing. Remove the plate and set it aside with the two screws. 12. The cover glass has a raised glass edge that goes about two-thirds of the way around the glass. Be sure this raised edge faces up towards you. Observe the position of the leading edge of the raised glass handle, marked in the illustration below as (A). Rotate the cover glass 90 degrees clockwise. 15. Flip the door over so the back faces up. 16. Reassemble the parts, preserving their new alignments. 17. Reinsert the single screw that goes under the striker plate. TIghten the screw securely. 21. Remove the two screws holding the metal door hinge to the dryer housing. Remove the hinge from the housing. 18. Rotate the striker cover and striker 180 degrees so the assembly fits to the install area on the opposite side of the door (where the hinge had been). Reinstall the striker cover and striker to the new location and securely tighten the two cover screws. Right Hand to Left Hand 22. Reattach the door hinge to the dryer housing at the left side of the dryer door opening. Tighten both screws completely, making sure they hold the hinge securely. 23. The door is now ready to be mounted back on the dryer. 10
-
 1
1 -
2
-
3
-
4
-
 5
5 -
 6
6 -
 7
7 -
 8
8 -
 9
9 -
 10
10 -
 11
11 -
 12
12 -
 13
13 -
 14
14 -
 15
15 -
16
-
17
-
18
-
19
-
20
-
21
-
22
-
23
-
24
-
25
-
26
-
27
-
28
-
29
-
30
-
31
-
32
-
33
-
34
-
35
-
36
-
37
-
38
-
39
-
40
-
41
-
42
-
43
-
44
-
45
-
46
-
47
-
48
-
49
-
50
-
51
-
52
-
53
-
54
-
55
-
56
-
57
-
58
-
59
-
60
-
61
-
62
-
63
-
64
-
65
-
66
-
67
-
68
 |
 |