Bosch WTVC6330US User Manual - Page 13
Water, Connection
 |
UPC - 825225882800
View all Bosch WTVC6330US manuals
Add to My Manuals
Save this manual to your list of manuals |
Page 13 highlights
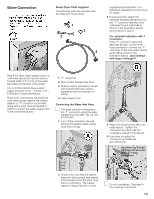
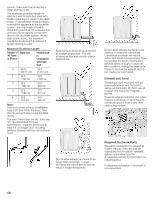
Water Connection Steam Dryer Parts Supplied The following parts are included with the shipment of your dryer: 1 3 2 4 supplied parts illustration. It is illustrated separately from the hose for clarity. 3. If space permits, attach the internally threaded (female) end of the Y" connector directly to the cold water faucet (option A as shown in the illustration above) and continue to step 6 For optional Installation with Y Connector If the Y" connector cannot be attached directly, use the short hose provided to connect the Y" connector to the cold water faucet (option B as shown in the illustration below) , and continue with steps 4 through 5. Attach the dryer water supply hose to a cold water faucet (the faucet must be located within 4 ft (1.2 m) of the water inlet valve on the back of the dryer). It is recommended to have a water supply pressure of 20 - 100 psi (1.37 6.89 bar) for best performance. Since most connections will share the cold water faucet used by the clothes washer, a Y connector is provided along with a short hose (if needed) in order to connect the water supply hose to the cold water faucet. 1. Y" connector 2. Short metal-braided inlet hose 3. Rubber washer (inserted in female end of short inlet hose, shown separately here for purposes of clarity). 4. water supply hose Connecting the Water Inlet Hose i The dryer must be connected to the Y" connector using the water supply hose provided. Do not use an old hose. 1. Turn off the cold water tap and remove the washer water supply hose from the tap. 4. Attach the short hose to the cold water faucet. Tighten the connection by hand until the coupling is seated on the faucet. 5. Use pliers to tighten the connection an additional two-thirds turn. Use pliers only to finish tightening 2/3's turn for metal-to-metal connections 2. Check to be sure that the rubber washer is fully inserted and seated in the female end of the short hose prior to continuing. The rubber washer is shown as item 3 in the i Do not overtighten. Damage to the coupling could result. 13
-
 1
1 -
2
-
3
-
4
-
5
-
6
-
7
-
 8
8 -
 9
9 -
 10
10 -
 11
11 -
 12
12 -
 13
13 -
 14
14 -
 15
15 -
 16
16 -
 17
17 -
 18
18 -
19
-
20
-
21
-
22
-
23
-
24
-
25
-
26
-
27
-
28
-
29
-
30
-
31
-
32
-
33
-
34
-
35
-
36
-
37
-
38
-
39
-
40
-
41
-
42
-
43
-
44
-
45
-
46
-
47
-
48
-
49
-
50
-
51
-
52
-
53
-
54
-
55
-
56
-
57
-
58
-
59
-
60
-
61
-
62
-
63
-
64
-
65
-
66
-
67
-
68
 |
 |
