Bosch WTVC6330US User Manual - Page 14
Electrical, Connection - rating
 |
UPC - 825225882800
View all Bosch WTVC6330US manuals
Add to My Manuals
Save this manual to your list of manuals |
Page 14 highlights
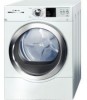
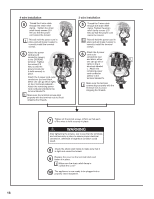
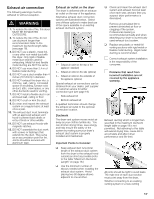
6. Attach the Y" adapter to the short hose. Tighten the coupling (by hand) until it is firmly seated on the hose. i Do not use pliers to tighten plastic threaded fittings onto plastic or metal threaded connections. 7. Attach the washer cold water supply hose to the Y" connector. Hand tighten only. 8. Attach the dryer water supply hose to the other coupling of the Y" connector. Hand tighten only. 9. Tighten only metal-to-metal couplings on the Y" connector and short hose an additional two-thirds turn using pliers. i Do not overtighten. Damage to the coupling could result. 10. Attach the right-angle connector on the water supply hose to the inlet valve located at the top left of the dryer. i Check to see that the rubber washer does not fall out, and is properly seated in the right-angle connector. 11. Hand tighten the coupling until it is seated on the connector. Do not use pliers, hand tighten only. i Do not overtighten. Damage to the coupling could result. 12. Turn on the water faucet. 13. Check for leaks around the Y" connector, faucet and all hoses. Electrical Connection d WARNING Power cord must be connected by a qualified technician or a licensed electrician only. Connect to individual branch circuit. Do not use an adapter. Do not use an extension cord. Do not remove ground prong. Your dryer comes without a power supply cord. The power cord must meet the following requirements: - UL listed in the USA - 208 ć 240 volt rated (minimum) - 30 amps - Type SRDT or DRT (UL 2158) - Five feet long (minimum) d WARNING Power cord must be connected by a qualified technician or a licensed electrician only. Use only a U.L. approved 30 amp power cord with strain relief clamp note manufacturer's instructions. Do not reuse old power cord. Cord must have closed loop or upturned end wire terminating connectors. Do not make a sharp bend or crimp wiring/conductor at connections. Only a 4Ćconductor cord shall be used when the appliance is installed in a mobile home, in a recreational vehicle, in a new branch circuit installation or an area where the local codes do not permit grounding through the neutral. Additional grounding procedure - Some local regulations may require a separate ground. In such cases, the required accessory ground wire, clamp and screw must be purchased separately. Contact your local dealer or customer service for additional details (see page 32). - Never ground the dryer to plastic plumbing lines, gas lines or water pipes. Grounding instruction This appliance must be grounded. In the event of a malfunction or breakdown, grounding will reduce the risk of electric shock by providing a path of least resistance for the electric current. 14
-
 1
1 -
2
-
3
-
4
-
5
-
6
-
7
-
8
-
 9
9 -
 10
10 -
 11
11 -
 12
12 -
 13
13 -
 14
14 -
 15
15 -
 16
16 -
 17
17 -
 18
18 -
 19
19 -
20
-
21
-
22
-
23
-
24
-
25
-
26
-
27
-
28
-
29
-
30
-
31
-
32
-
33
-
34
-
35
-
36
-
37
-
38
-
39
-
40
-
41
-
42
-
43
-
44
-
45
-
46
-
47
-
48
-
49
-
50
-
51
-
52
-
53
-
54
-
55
-
56
-
57
-
58
-
59
-
60
-
61
-
62
-
63
-
64
-
65
-
66
-
67
-
68
 |
 |