Brother International DB2-B737 Network Users Manual - English - Page 17
Operation, Models, DB2-B737
 |
View all Brother International DB2-B737 manuals
Add to My Manuals
Save this manual to your list of manuals |
Page 17 highlights
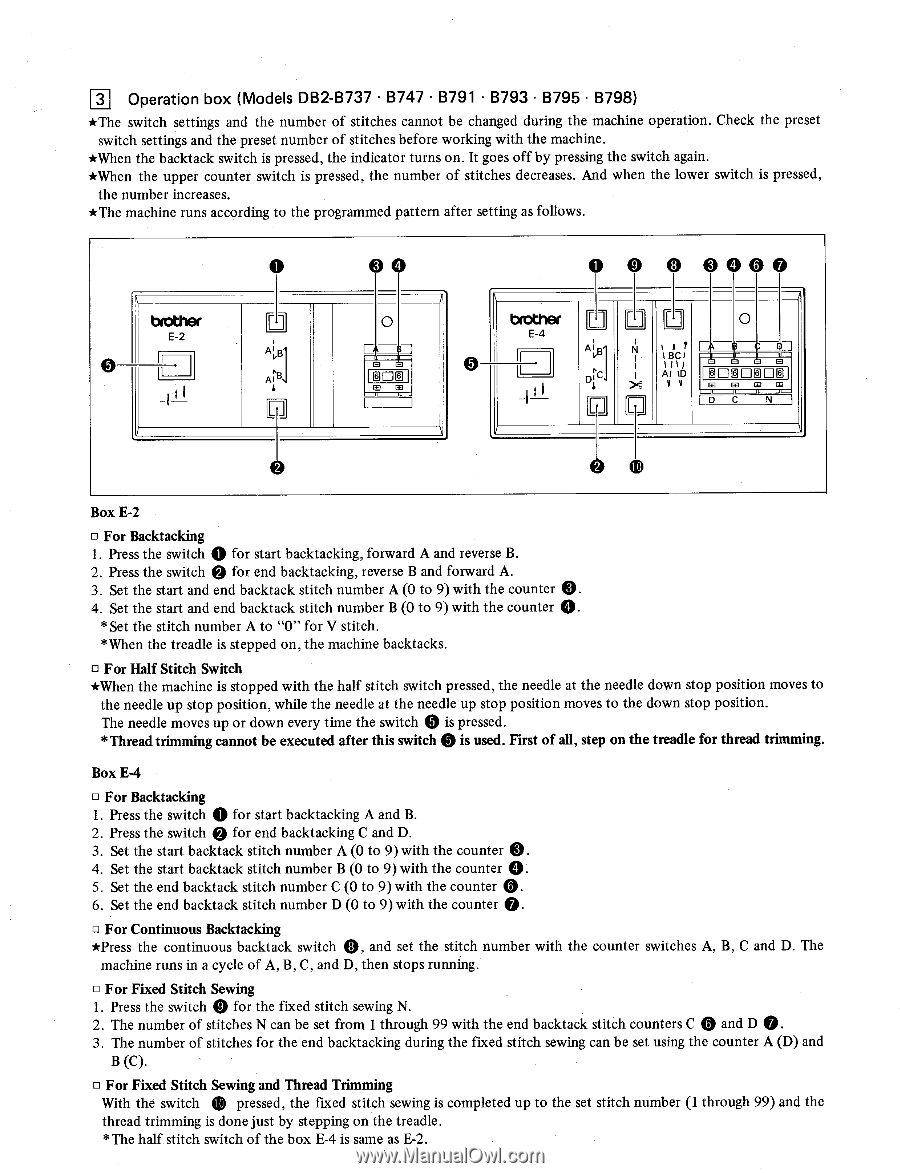
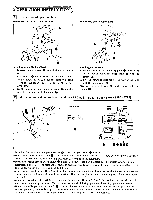
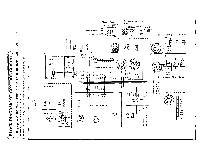
3 Operation box (Models DB2-B737 • B747 • B791 • B793 • B795 • B798) *The switch settings and the number of stitches cannot be changed during the machine operation. Check the preset switch settings and the preset number of stitches before working with the machine. *When the backtack switch is pressed, the indicator turns on. It goes off by pressing the switch again. *When the upper counter switch is pressed, the number of stitches decreases. And when the lower switch is pressed, the number increases. *The machine runs according to the programmed pattern after setting as follows. brother E-2 0 II II -l t d 0 DI i Al031 Aid & LY 0 O LA EOE 0 0 0 0000 ro 6 bmEt-h4er 1-- O 0 II II 4 [-Lp -IpLi ALB Dri'C t N I I x \ d'ci LA Illi ---c D2 r5 ti = Al ID vA w EOaDgOECIE _I L__II__11 .J D C N 0 Box E-2 O For Backtacking 1. Press the switch 0 for start backtacking, forward A and reverse B. 2. Press the switch 0 for end backtacking, reverse B and forward A. 0. 3. Set the start and end backtack stitch number A (0 to 9) with the counter 0. 4. Set the start and end backtack stitch number B (0 to 9) with the counter * Set the stitch number A to "0" for V stitch. * When the treadle is stepped on, the machine backtacks. o For Half Stitch Switch *When the machine is stopped with the half stitch switch pressed, the needle at the needle down stop position moves to the needle up stop position, while the needle at the needle up stop position moves to the down stop position. The needle moves up or down every time the switch 0 is pressed. *Thread trimming cannot be executed after this switch 0 is used. First of all, step on the treadle for thread trimming. Box E-4 El For Backtacking 1. Press the switch 0 for start backtacking A and B. 2. Press the switch 0 for end backtacking C and D. 3. Set the start backtack stitch number A (0 to 9) with the counter 0. 4. Set the start backtack stitch number B (0 to 9) with the counter 0. 5. Set the end backtack stitch number C (0 to 9) with the counter 0. 6. Set the end backtack stitch number D (0 to 9) with the counter 0. O For Continuous Backtacking *Press the continuous backtack switch 0, and set the stitch number with the counter switches A, B, C and D. The machine runs in a cycle of A, B, C, and D, then stops running. ▪ For Fixed Stitch Sewing 1. Press the switch 0 for the fixed stitch sewing N. 2. The number of stitches N can be set from 1 through 99 with the end backtack stitch counters C 0 and D 0. 3. The number of stitches for the end backtacking during the fixed stitch sewing can be set using the counter A (D) and B (C). O For Fixed Stitch Sewing and Thread Trimming With the switch 0 pressed, the fixed stitch sewing is completed up to the set stitch number (1 through 99) and the thread trimming is done just by stepping on the treadle. *The half stitch switch of the box E-4 is same as E-2.
-
 1
1 -
2
-
3
-
4
-
5
-
6
-
7
-
8
-
9
-
10
-
11
-
 12
12 -
 13
13 -
 14
14 -
 15
15 -
 16
16 -
 17
17 -
 18
18 -
 19
19 -
 20
20 -
 21
21 -
 22
22 -
23
-
24
-
25
-
26
-
27
-
28
-
29
-
30
-
31
-
32
 |
 |