Brother International DCP 330C Quick Setup Guide - English - Page 12
Setting the LCD contrast, 8 Setting the date and time, Date/Time, Year:20, Month
 |
View all Brother International DCP 330C manuals
Add to My Manuals
Save this manual to your list of manuals |
Page 12 highlights
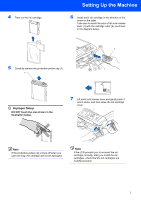
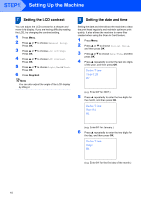
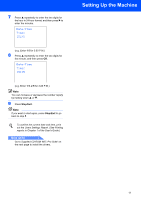
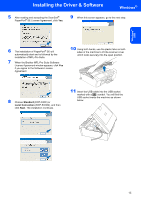
STEP1 Setting Up the Machine 7 Setting the LCD contrast You can adjust the LCD contrast for a sharper and more vivid display. If you are having difficulty reading the LCD, try changing the contrast setting. 1 Press Menu. 2 Press a or b to choose General Setup. Press OK. 3 Press a or b to choose LCD Settings. Press OK. 4 Press a or b to choose LCD Contrast. Press OK. 5 Press a or b to choose Light, Med or Dark. Press OK. 6 Press Stop/Exit. Note You can also adjust the angle of the LCD display by lifting it. 8 Setting the date and time Setting the date and time allows the machine to clean the print head regularly and maintain optimum print quality. It also allows the machine to name files created when using the Scan to Card feature. 1 Press Menu. 2 Press a or b to choose Initial Setup, and then press OK. 3 Press a or b to choose Date/Time, and then press OK. 4 Press a repeatedly to enter the last two digits of the year, and then press OK. Date/Time Year:20 07 (e.g. Enter 0 7 for 2007.) 5 Press a repeatedly to enter the two digits for the month, and then press OK. Date/Time Month: 01 (e.g. Enter 0 1 for January.) 6 Press a repeatedly to enter the two digits for the day, and then press OK. Date/Time Day: 01 (e.g. Enter 0 1 for the first day of the month.) 10
-
 1
1 -
2
-
3
-
4
-
5
-
6
-
 7
7 -
 8
8 -
 9
9 -
 10
10 -
 11
11 -
 12
12 -
 13
13 -
 14
14 -
 15
15 -
 16
16 -
 17
17 -
18
-
19
-
20
-
21
-
22
-
23
-
24
-
25
-
26
-
27
-
28
-
29
-
30
-
31
-
32
-
33
 |
 |