Brother International DCP 330C Quick Setup Guide - English - Page 20
Install MFL-Pro Suite, Network Connection - windows 10
 |
View all Brother International DCP 330C manuals
Add to My Manuals
Save this manual to your list of manuals |
Page 20 highlights
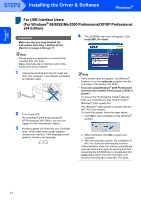
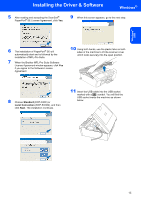
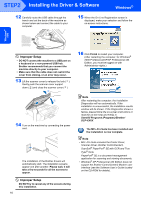
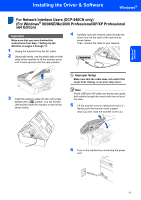
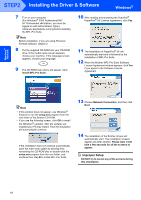
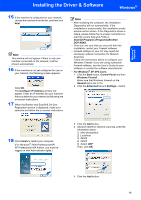
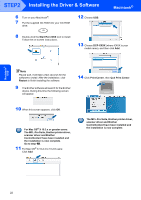
Windows® Network STEP2 Installing the Driver & Software Windows® 7 Turn on your computer. (For Windows® 2000 Professional/XP/ XP Professional x64 Edition, you must be logged on with Administrator rights.) Close any applications running before installing the MFL-Pro Suite. Note Before installation, if you are using Personal Firewall software, disable it. 8 Put the supplied CD-ROM into your CD-ROM drive. If the model name screen appears, choose your machine. If the language screen appears, choose your language. 9 The CD-ROM main menu will appear. Click Install MFL-Pro Suite. 10 After reading and accepting the ScanSoft® PaperPort® SE License Agreement, click Yes. 11 The installation of PaperPort® SE will automatically start and is followed by the installation of MFL-Pro Suite. 12 When the Brother MFL-Pro Suite Software License Agreement window appears, click Yes if you agree to the Software License Agreement. Note • If this window does not appear, use Windows® Explorer to run the setup.exe program from the root folder of the Brother CD-ROM. • If you see the following screen, click OK to install the Windows® updates. After the updates are installed your PC may restart. Then the installation will automatically continue. If the installation does not continue automatically, open the main menu again by ejecting then reinserting the CD-ROM disc or double-click the setup.exe program from the root folder, and continue from step 9 to install MFL-Pro Suite. 13 Choose Network Connection, and then click Next. 14 The installation of the Brother drivers will automatically start. The installation screens appear one after another. Please wait, it will take a few seconds for all the screens to appear. Improper Setup DO NOT try to cancel any of the screens during this installation. 18
-
 1
1 -
2
-
3
-
4
-
5
-
6
-
7
-
8
-
9
-
10
-
11
-
12
-
13
-
14
-
 15
15 -
 16
16 -
 17
17 -
 18
18 -
 19
19 -
 20
20 -
 21
21 -
 22
22 -
 23
23 -
 24
24 -
 25
25 -
26
-
27
-
28
-
29
-
30
-
31
-
32
-
33
 |
 |
