Brother International GT-381 Instruction Manual - English - Page 115
Print Heads app. 2 mm. See 4-5. Placing the T-shirt
 |
View all Brother International GT-381 manuals
Add to My Manuals
Save this manual to your list of manuals |
Page 115 highlights
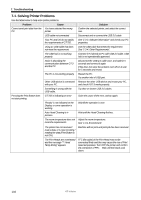
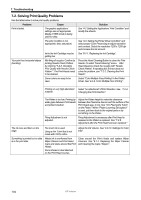
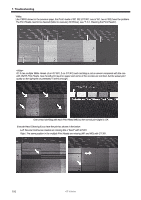
7. Troubleshooting Problem The outlines of printed image are not clear, or texts and outlines are printed doubled. T-shirt is smudged with ink. Pale colors are getting disappeared while printing. White is uneven. White is not white enough. Cause Solution The Platen height may be wrong with a too large gap. Adjust the Platen height to make the clearance between the Clearance Sensor and the surface of the Print Heads app. 2 mm. See "4-5. Placing the T-shirt on the Platen". When "Platen Lowering Set (option)" is used, put them back to the original parts or lay something on the Platen. Print Heads hit the garment Keep the surface flat and adjust the height. (esp. both edges). See "4-5. Placing the T-shirt on the Platen". Flushing Plate Sponge is full of waste ink. Replace the Flushing Plate Sponge and Flushing Plate Felt. See "6-1-3. Replacing Flushing Plate Sponge and Flushing Plate Felt". Clearance Sensor is stained. Wipe off the both sides of Clearance Sensor. See "6-1-6. Cleaning the inside of the printer and restart". The Platen Sheet needs to be replaced and is dirty. See "6-2-4. Replacing the Platen Sheet". The nozzles f the Print Heads are getting dried under the humid high-temperature condition. See "7-2-10. Adjusting the Flushing Interval", "7-2-11. Adjusting the Flushing Volume". Pretreatment was not applied enough or done unevenly. Apply evenly. See "4-6-1. Applying the Pretreatment". Water drops on the Pretreatment-cured surface cause stains. Do not wet the cured surface. See "4-6-1. Applying the Pretreatment". Pretreatment was not applied enough. See "4-6-1. Applying the Pretreatment". Poor curing: Temperature was too low and/or the pressure is too low. Confirm the temperature and increase the pressure of heat press. See "4-6-1. Applying the Pretreatment". Mis-firing of nozzles: Confirm by printing Nozzle Check Pattern. by referring "7-2-3. Checking Print Quality with Nozzle Check Pattern ". The Print Heads need to be cleaned. Press the Head Cleaning Button to clean the Print Heads. Or select "Head Cleaning" menu. After Head Cleaning, check the nozzles with "Nozzle Check Pattern. If repeating this 5 times does not solve the problem, see "7-2-2. Cleaning the Print Heads". Daily Cleaning White is not Do the steps in "6-2-1. Daily Cleaning White for done. White Ink Cartridges were replacing dull White Ink". Shake the White Ink not shaken enough. Cartridges well. GT-3 Series 105
-
 1
1 -
2
-
3
-
4
-
5
-
6
-
7
-
8
-
9
-
10
-
11
-
12
-
13
-
14
-
15
-
16
-
17
-
18
-
19
-
20
-
21
-
22
-
23
-
24
-
25
-
26
-
27
-
28
-
29
-
30
-
31
-
32
-
33
-
34
-
35
-
36
-
37
-
38
-
39
-
40
-
41
-
42
-
43
-
44
-
45
-
46
-
47
-
48
-
49
-
50
-
51
-
52
-
53
-
54
-
55
-
56
-
57
-
58
-
59
-
60
-
61
-
62
-
63
-
64
-
65
-
66
-
67
-
68
-
69
-
70
-
71
-
72
-
73
-
74
-
75
-
76
-
77
-
78
-
79
-
80
-
81
-
82
-
83
-
84
-
85
-
86
-
87
-
88
-
89
-
90
-
91
-
92
-
93
-
94
-
95
-
96
-
97
-
98
-
99
-
100
-
101
-
102
-
103
-
104
-
105
-
106
-
107
-
108
-
109
-
 110
110 -
 111
111 -
 112
112 -
 113
113 -
 114
114 -
 115
115 -
 116
116 -
 117
117 -
 118
118 -
 119
119 -
 120
120 -
121
-
122
-
123
-
124
-
125
-
126
-
127
-
128
-
129
-
130
-
131
-
132
-
133
-
134
-
135
-
136
-
137
-
138
-
139
-
140
-
141
-
142
-
143
-
144
-
145
-
146
-
147
-
148
 |
 |