Brother International GT-381 Instruction Manual - English - Page 85
Making One Print, 4-6-3. Printing More than One Print Using the Same Print Data
 |
View all Brother International GT-381 manuals
Add to My Manuals
Save this manual to your list of manuals |
Page 85 highlights
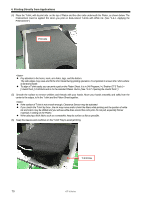
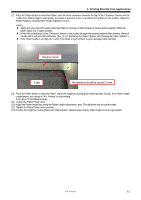
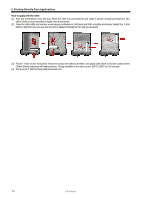
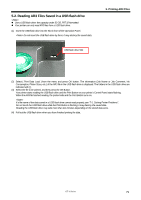
4. Printing Directly from Applications 4-6-2. Making One Print GT-3 receives the next print data from PC in printing. Just before you press the Print Button, confirm the Job Comment (or file name) and the counter on the display of the Control Panel. (1) Make sure the Print Button has been turned on, which indicates your printer has received the print data successfully. (2) Make sure that the Platen is ejected and the printed material is set properly. If not, press the Platen Button. (3) Make sure the Platen Height, The clearance between the Clearance Sensor and the surface of the Print Heads should be app. 2 mm. Before / after you print on thicker material, use Platen Button to move the Platen to confirm the clearance. (4) Confirm the Job Comment on the Display shows the correct print job details. Check the counter whether it is 000 (new) or not (previous). (5) Press the Print Button to start printing operation. When the printing is completed, the Platen is ejected and an audible indication is given. If printing is to be stopped before it is finished, press Stop Button to stop the operation. Then press Platen Button to eject the Platen. z By pressing the Print Button, your printer automatically starts cleaning the Print Head every 24 prints (default) or every numbers of prints you have set (see "7-2-5. Changing the Auto Head Cleaning Setting"), or after your printer has not been used for more than two hours. In this case, wait until the cleaning completes (takes about 20 seconds), and then printing will automatically start. z Keep away from the moving platen. z If the Platen is not at the appropriate position when the Print Button is pressed, it automatically adjusts the position to start printing. Press the Print Button again to start printing after the Platen is available z Do not open unlock or open the Cover during printing. If you do the power is turned off for safety reasons. 4-6-3. Printing More than One Print Using the Same Print Data After making one print following the procedure in "4-6-2. Making One Print", you can continue making more prints using the same print data. (1) Confirm the Platen height and the Print Direction. (2) Press the Print Button to start printing. The counter indicates how many images are printed. GT-3 Series 75
-
 1
1 -
2
-
3
-
4
-
5
-
6
-
7
-
8
-
9
-
10
-
11
-
12
-
13
-
14
-
15
-
16
-
17
-
18
-
19
-
20
-
21
-
22
-
23
-
24
-
25
-
26
-
27
-
28
-
29
-
30
-
31
-
32
-
33
-
34
-
35
-
36
-
37
-
38
-
39
-
40
-
41
-
42
-
43
-
44
-
45
-
46
-
47
-
48
-
49
-
50
-
51
-
52
-
53
-
54
-
55
-
56
-
57
-
58
-
59
-
60
-
61
-
62
-
63
-
64
-
65
-
66
-
67
-
68
-
69
-
70
-
71
-
72
-
73
-
74
-
75
-
76
-
77
-
78
-
79
-
 80
80 -
 81
81 -
 82
82 -
 83
83 -
 84
84 -
 85
85 -
 86
86 -
 87
87 -
 88
88 -
 89
89 -
 90
90 -
91
-
92
-
93
-
94
-
95
-
96
-
97
-
98
-
99
-
100
-
101
-
102
-
103
-
104
-
105
-
106
-
107
-
108
-
109
-
110
-
111
-
112
-
113
-
114
-
115
-
116
-
117
-
118
-
119
-
120
-
121
-
122
-
123
-
124
-
125
-
126
-
127
-
128
-
129
-
130
-
131
-
132
-
133
-
134
-
135
-
136
-
137
-
138
-
139
-
140
-
141
-
142
-
143
-
144
-
145
-
146
-
147
-
148
 |
 |