Brother International GT-381 Instruction Manual - English - Page 123
Clearance Sensor, W3 and W4
 |
View all Brother International GT-381 manuals
Add to My Manuals
Save this manual to your list of manuals |
Page 123 highlights
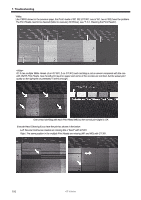
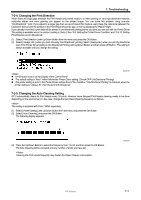
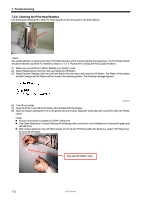
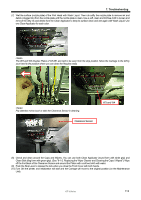
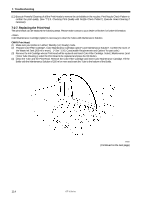
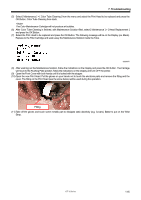
7. Troubleshooting (7) Wet the surface (nozzle plate) of the Print Head with Wash Liquid. Then rub softly the nozzle plate to remove ink and debris (clogged ink) from the nozzle plate until the nozzle plate is clean. Use a soft, clean and lint-free cloth to loosen and remove the dirty ink and debris from the Clean Applicator to keep its surface clean and wet again with Wash Liquid. Use one Clean Applicator for each color. The W3 and W4 Nozzles Plates of GT-381 are hard to be seen from the stop position. Move the Carriage to the left by your hand to the position where you can clean the Nozzles easily. Pay attention not to touch or stain the Clearance Sensor in cleaning. Clearance Sensor W3 and W4 (8) Check and clean around the Caps and Wipers. You can use both Clean Applicator (round form with white grip) and Clean Stick (flag form with green grip). (See "6-1-2. Replacing the Wiper Cleaner and Cleaning the Caps / Wipers"). Wipe off the front/back of the Clearance Sensor and around the Platen with a soft wet cloth with water. (9) Push the Stop Lever to release the lock when you close the Front Cover with both hands. (10) Turn ON the printer, and initialization will start and the Carriage will move to the original position (on the Maintenance Unit). GT-3 Series 113
-
 1
1 -
2
-
3
-
4
-
5
-
6
-
7
-
8
-
9
-
10
-
11
-
12
-
13
-
14
-
15
-
16
-
17
-
18
-
19
-
20
-
21
-
22
-
23
-
24
-
25
-
26
-
27
-
28
-
29
-
30
-
31
-
32
-
33
-
34
-
35
-
36
-
37
-
38
-
39
-
40
-
41
-
42
-
43
-
44
-
45
-
46
-
47
-
48
-
49
-
50
-
51
-
52
-
53
-
54
-
55
-
56
-
57
-
58
-
59
-
60
-
61
-
62
-
63
-
64
-
65
-
66
-
67
-
68
-
69
-
70
-
71
-
72
-
73
-
74
-
75
-
76
-
77
-
78
-
79
-
80
-
81
-
82
-
83
-
84
-
85
-
86
-
87
-
88
-
89
-
90
-
91
-
92
-
93
-
94
-
95
-
96
-
97
-
98
-
99
-
100
-
101
-
102
-
103
-
104
-
105
-
106
-
107
-
108
-
109
-
110
-
111
-
112
-
113
-
114
-
115
-
116
-
117
-
 118
118 -
 119
119 -
 120
120 -
 121
121 -
 122
122 -
 123
123 -
 124
124 -
 125
125 -
 126
126 -
 127
127 -
 128
128 -
129
-
130
-
131
-
132
-
133
-
134
-
135
-
136
-
137
-
138
-
139
-
140
-
141
-
142
-
143
-
144
-
145
-
146
-
147
-
148
 |
 |
