Brother International GT-381 Instruction Manual - English - Page 40
Basic Printing Procedure, 4-2. Setting the Applications’ Print Condition - direct to garment printer
 |
View all Brother International GT-381 manuals
Add to My Manuals
Save this manual to your list of manuals |
Page 40 highlights
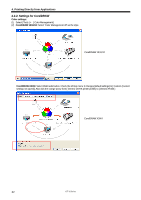
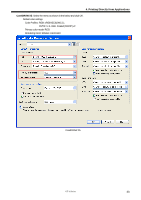
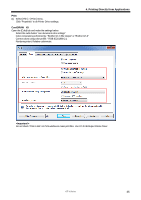
4. Printing Directly from Applications 4-1. Basic Printing Procedure (1) Set the proper color settings and print conditions of the application. For precise editing and output, applications such as Adobe Photoshop, Illustrator, CorelDRAW, Paint Shop Photo Pro are recommended, e.g. to deal with higher resolution images (200 dpi or higher). See "4-2. Setting the Applications' Print Condition" for further details. (2) Create the artwork using a suitable graphic application. Use RGB=254 (=254, 254, 254) white for white color. RGB=255 (=255, 255, 255) white (paper color) is transparent color with no ink printed. (3) Select [ File ] > [ Print ] menu of your application an set Printer Driver conditions. See "4-3. Setting the Printer Driver Condition". (4) Turn on your printer: See "3-2-1. Turning On Your Printer". (5) Execute [ Daily Cleaning White ] to keep the whiteness of White Ink. See "6-2-1. Daily Cleaning White for replacing dull White Ink". Test print for both CMYK and White and check the print quality. See "7-2-3. Checking Print Quality with Nozzle Check Pattern". (6) Send data to your Printer. Select Printer Driver: either GT-3 Printer Driver (USB 2.0 Cable) for direct print or GT-3 FileOutput Printer Driver to make print data file (.ar3). As for sending .ar3 file to your Printer, see "5. Printing AR3 Files". (7) Install the Platen of the size you have selected in step (3) "4-3. Setting the Printer Driver Condition". See "4-4. Uninstalling / Installing the Platen". (8) Set the T-shirt (as for dark garments, pretreated. See "4-6-1. Applying the Pretreatment") on the Platen and adjust the Platen height. The operation on the both platens (Left/Right) is the same. See "4-5. Placing the T-shirt on the Platen". (9) Press the Print Button on the Control Panel to start printing. See "4-6-2. Making One Print.". (10) Remove the "printed" T-shirt from the Platen. See "4-7. Removing the T-shirt from the Platen". (11) Fix the ink with heat onto the T-shirt. Use a conveyer oven or a heat press to fix the ink onto the T-shirt. See "4-8. Curing the Ink onto the T-shirt". (12) Repeat (8) to (11) until all the prints are finished. (13) See the Chapter 6 for necessary maintenance and for regularly and more-than-2-week storage. (14) Turn off your printer. See "3-2-2. Turning Off Your Printer". 4-2. Setting the Applications' Print Condition This section describes the settings for correct printing of garments. 4-2-1. Common Notice for All Applications Color Mode / Color Space: GT-3 Printer is RGB (Red Green Blue) printer. If you use Adobe, Corel applications, please note that some colors in CMYK (Cyan Magenta Yellow Black) mode cannot be printed as expected because of the color matching process. We strongly recommend that the artwork should be made in RGB mode and working space should be always "sRGB IEC61966-2.1". 30 GT-3 Series
-
 1
1 -
2
-
3
-
4
-
5
-
6
-
7
-
8
-
9
-
10
-
11
-
12
-
13
-
14
-
15
-
16
-
17
-
18
-
19
-
20
-
21
-
22
-
23
-
24
-
25
-
26
-
27
-
28
-
29
-
30
-
31
-
32
-
33
-
34
-
 35
35 -
 36
36 -
 37
37 -
 38
38 -
 39
39 -
 40
40 -
 41
41 -
 42
42 -
 43
43 -
 44
44 -
 45
45 -
46
-
47
-
48
-
49
-
50
-
51
-
52
-
53
-
54
-
55
-
56
-
57
-
58
-
59
-
60
-
61
-
62
-
63
-
64
-
65
-
66
-
67
-
68
-
69
-
70
-
71
-
72
-
73
-
74
-
75
-
76
-
77
-
78
-
79
-
80
-
81
-
82
-
83
-
84
-
85
-
86
-
87
-
88
-
89
-
90
-
91
-
92
-
93
-
94
-
95
-
96
-
97
-
98
-
99
-
100
-
101
-
102
-
103
-
104
-
105
-
106
-
107
-
108
-
109
-
110
-
111
-
112
-
113
-
114
-
115
-
116
-
117
-
118
-
119
-
120
-
121
-
122
-
123
-
124
-
125
-
126
-
127
-
128
-
129
-
130
-
131
-
132
-
133
-
134
-
135
-
136
-
137
-
138
-
139
-
140
-
141
-
142
-
143
-
144
-
145
-
146
-
147
-
148
 |
 |