Brother International HL-4200CN Users Manual - English - Page 34
Back View, Description - cartridge
 |
View all Brother International HL-4200CN manuals
Add to My Manuals
Save this manual to your list of manuals |
Page 34 highlights
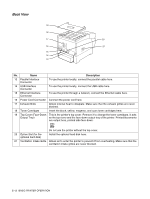
Back View 19 18 17 20 16 21 15 14 13 No. Name Description 13 Parallel Interface Connector To use the printer locally, connect the parallel cable here. 14 USB Interface Connector To use the printer locally, connect the USB cable here. 15 Ethernet Interface Connector To use the printer through a network, connect the Ethernet cable here. 16 Power Cord Connector Connect the power cord here. 17 Exhaust Grille Allows internal heat to dissipate. Make sure that the exhaust grilles are never blocked. 18 Toner Cartridges Insert the black, yellow, magenta, and cyan toner cartridges here. 19 Top Cover (Face-Down This is the printer's top cover. Remove it to change the toner cartridges. It acts Output Tray) as the top cover and the face-down output tray of the printer. Printed documents are output here, printed side face down. Do not use the printer without the top cover. 20 Option Slot (for the optional hard disk) Install the optional hard disk here. 21 Ventilation Intake Grille Allows air to enter the printer to prevent it from overheating. Make sure that the ventilation intake grilles are never blocked. 2 - 2 BASIC PRINTER OPERATION
-
 1
1 -
2
-
3
-
4
-
5
-
6
-
7
-
8
-
9
-
10
-
11
-
12
-
13
-
14
-
15
-
16
-
17
-
18
-
19
-
20
-
21
-
22
-
23
-
24
-
25
-
26
-
27
-
28
-
 29
29 -
 30
30 -
 31
31 -
 32
32 -
 33
33 -
 34
34 -
 35
35 -
 36
36 -
 37
37 -
 38
38 -
 39
39 -
40
-
41
-
42
-
43
-
44
-
45
-
46
-
47
-
48
-
49
-
50
-
51
-
52
-
53
-
54
-
55
-
56
-
57
-
58
-
59
-
60
-
61
-
62
-
63
-
64
-
65
-
66
-
67
-
68
-
69
-
70
-
71
-
72
-
73
-
74
-
75
-
76
-
77
-
78
-
79
-
80
-
81
-
82
-
83
-
84
-
85
-
86
-
87
-
88
-
89
-
90
-
91
-
92
-
93
-
94
-
95
-
96
-
97
-
98
-
99
-
100
-
101
-
102
-
103
-
104
-
105
-
106
-
107
-
108
-
109
-
110
-
111
-
112
-
113
-
114
-
115
-
116
-
117
-
118
-
119
-
120
-
121
-
122
-
123
-
124
-
125
-
126
-
127
-
128
-
129
-
130
-
131
-
132
-
133
-
134
-
135
-
136
-
137
-
138
-
139
-
140
-
141
-
142
-
143
-
144
-
145
-
146
-
147
-
148
-
149
-
150
-
151
-
152
-
153
-
154
-
155
-
156
-
157
-
158
-
159
-
160
-
161
-
162
-
163
-
164
-
165
-
166
 |
 |
