Brother International HL 5280DW Quick Setup Guide - English - Page 26
Improper Setup
 |
UPC - 012502614456
View all Brother International HL 5280DW manuals
Add to My Manuals
Save this manual to your list of manuals |
Page 26 highlights
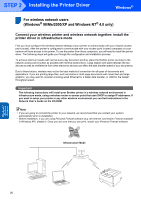
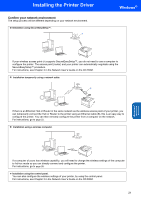
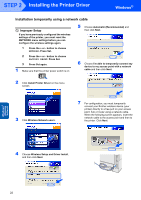
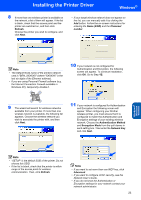
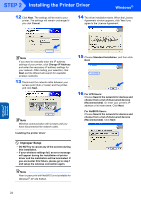
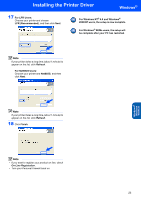
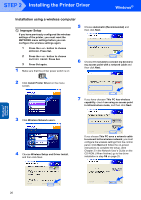
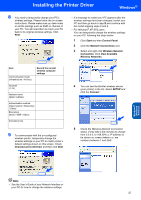
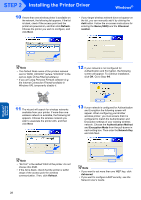
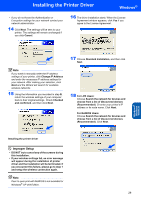
STEP 2 Installing the Printer Driver Windows® 12 Click Next. The settings will be sent to your printer. The settings will remain unchanged if you click Cancel. 14 The driver installation starts. When the License Agreement window appears, click Yes if you agree to the License Agreement. Windows® Wireless Network Note If you want to manually enter the IP address settings of your printer, click Change IP Address and enter the necessary IP address settings for your network. After making your selection, click Next and the Wizard will search for available wireless networks. 13 Disconnect the network cable between your access point (hub or router) and the printer, and click Next. Note Wireless communication will not start until you have disconnected the network cable. Installing the printer driver 15 Choose Standard Installation, and then click Next. 16 For LPR Users: Choose Search the network for devices and choose from a list of discovered devices (Recommended). Or enter your printer's IP address or its node name. Click Next. For NetBIOS Users: Choose Search the network for devices and choose from a list of discovered devices (Recommended). Click Next. Improper Setup • DO NOT try to cancel any of the screens during this installation. • If your wireless settings fail, an error message will appear during the installation of printer driver and the installation will be terminated. If you encounter this failure, please go to step 1 and setup the wireless connection again. Note Peer-to-peer print with NetBIOS is not available for Windows® XP x64 Edition. 24
-
 1
1 -
2
-
3
-
4
-
5
-
6
-
7
-
8
-
9
-
10
-
11
-
12
-
13
-
14
-
15
-
16
-
17
-
18
-
19
-
20
-
 21
21 -
 22
22 -
 23
23 -
 24
24 -
 25
25 -
 26
26 -
 27
27 -
 28
28 -
 29
29 -
 30
30 -
 31
31 -
32
-
33
-
34
-
35
-
36
-
37
-
38
-
39
-
40
-
41
-
42
-
43
-
44
-
45
-
46
-
47
-
48
-
49
-
50
-
51
-
52
-
53
-
54
-
55
-
56
 |
 |
