Brother International HL-7050N Quick Setup Guide - English - Page 31
Setting your IP Address, Subnet Mask and Gateway (Using the Control panel), NETWORK, TCP/IP
 |
UPC - 012502603375
View all Brother International HL-7050N manuals
Add to My Manuals
Save this manual to your list of manuals |
Page 31 highlights
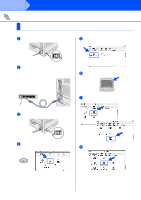
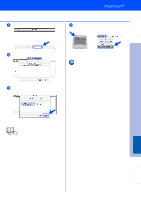
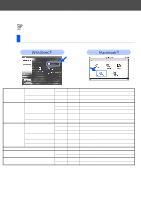
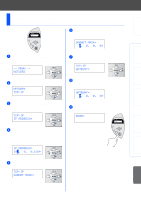
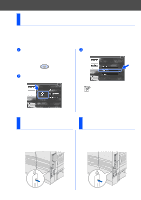
Setting Up Your Printer Windows® USB Windows® Parallel Installing the Driver Windows® Network Setting your IP Address, Subnet Mask and Gateway (Using the Control panel) 6 Enter the subnet mask settings in the same way that you entered the IP address. An asterisk mark (*) appears on the LCD. SUBNET MASK= 0. 0. 0. 0* 1 Press the + button until NETWORK is displayed. Press the Set button. -- MENU -NETWORK 2 Press the Set button again. NETWORK TCP/IP 3 Press the + button until IP ADDRESS= is displayed. Press the Set button. TCP/IP IP ADDRESS= 7 Press the + button until GATEWAY= is displayed. Press the Set button. TCP/IP GATEWAY= 8 Enter the gateway settings in the same way that you entered the IP address. An asterisk mark (*) appears on the LCD. GATEWAY= 0. 0. 0. 0* 9 Press the Go button to put the printer back into its READY state. READY 4 Enter the IP address of the printer using the + and - buttons. Press the Set button to go to the next digit. Press the Set button to complete the IP address. An asterisk mark (*) appears on the LCD. IP ADDRESS= 192. 0. 0.192* 5 Press the + button until SUBNET MASK= is displayed. Press the Set button. TCP/IP SUBNET MASK= Macintosh ® USB Macintosh ® Network Fo r Administrator 29
-
 1
1 -
2
-
3
-
4
-
5
-
6
-
7
-
8
-
9
-
10
-
11
-
12
-
13
-
14
-
15
-
16
-
17
-
18
-
19
-
20
-
21
-
22
-
23
-
24
-
25
-
 26
26 -
 27
27 -
 28
28 -
 29
29 -
 30
30 -
 31
31 -
 32
32 -
 33
33 -
 34
34 -
 35
35
 |
 |
