Brother International HL-7050N Quick Setup Guide - English - Page 6
Getting Started, Carton Components, Control Panel - toner cartridge
 |
UPC - 012502603375
View all Brother International HL-7050N manuals
Add to My Manuals
Save this manual to your list of manuals |
Page 6 highlights
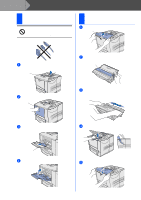
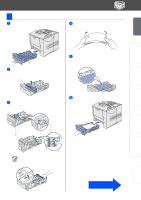
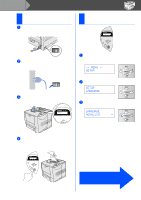
■ Getting Started Carton Components Printer 2 1 3 4 CD-ROM (including User's Guide) Quick Setup Guide 5 1 Control Panel 2 Extension Flap 3 Top cover 4 Multi-purpose Tray 5 Paper Tray Drum Unit Assembly AC Power Cord (including Toner Cartridge) Carton components may differ from one country to another. Save all packing materials and the printer carton. ■ The interface cable is not a standard accessory. Please purchase the appropriate interface cable for the interface you intend to use (Parallel, USB or Network). ■ For Parallel use a shielded interface cable that is IEEE 1284-compliant. Control Panel 1 1 Data LED : Orange On Data remains in the printer buffer. Blinking Receiving or processing data. Off No remaining data. 2 Reprint Button 5 Select the Reprint menu. Please enhance the RAMDISK size when you want to use the Reprint functions without the optional HDD or CompactFlash. User's Guide Chapter 4. 2 4 3 The control panel has a buzzer function for visually-impaired users. See Chapter 3 in the User's Guide for more information. User's Guide Chapter 3. 3 Job Cancel Button Stop and cancel the printer operation in progress. 4 Go Button Exit from the control panel menu. Reprint setting or clear error messages. Pause / Continue printing. 5 Menu Buttons + Move forward through menus. - Move backward through menus. Set Select the Control Panel. Set the selected menus and settings. Back Go back one level in the menu structure. 4
-
 1
1 -
 2
2 -
 3
3 -
 4
4 -
 5
5 -
 6
6 -
 7
7 -
 8
8 -
 9
9 -
 10
10 -
 11
11 -
 12
12 -
13
-
14
-
15
-
16
-
17
-
18
-
19
-
20
-
21
-
22
-
23
-
24
-
25
-
26
-
27
-
28
-
29
-
30
-
31
-
32
-
33
-
34
-
35
 |
 |
