Brother International IntelliFAX 1840c Users Manual - English - Page 128
Printing images
 |
UPC - 012502610892
View all Brother International IntelliFAX 1840c manuals
Add to My Manuals
Save this manual to your list of manuals |
Page 128 highlights
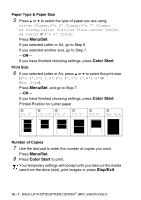
Printing images Before you can print an individual image, you have to know the image number. Print the Index first. (See Printing the Index (Thumbnails) on page 10-5.) 1 Make sure you have inserted the media card. Press PhotoCapture. (See page 10-3.) 2 Press ▲ or ▼ to choose Print Images. Press Menu/Set. If your media card contains valid DPOF information, the LCD shows DPOF Print:Yes, please go to DPOF printing on page 10-8. 3 Use the dial pad to enter the image number that you want to print from the Index page (Thumbnails). Enter & Set Key No.:1,3 Press Menu/Set. Repeat this step until you have entered all the image numbers that you want to print. You can enter all the numbers at one time by using the key for a comma or the # key for hyphen. (For example, Enter 1 3 6 - to print images No.1, No.3 and No.6. Enter 1#5 to print images No.1 to No.5). 4 After you have selected all the image numbers, press Menu/Set again, and go to Step 5. -OR- If you have finished choosing settings, press Color Start. WALK-UP PHOTOCAPTURE CENTER™ (MFC-3340CN ONLY) 10 - 6
-
 1
1 -
2
-
3
-
4
-
5
-
6
-
7
-
8
-
9
-
10
-
11
-
12
-
13
-
14
-
15
-
16
-
17
-
18
-
19
-
20
-
21
-
22
-
23
-
24
-
25
-
26
-
27
-
28
-
29
-
30
-
31
-
32
-
33
-
34
-
35
-
36
-
37
-
38
-
39
-
40
-
41
-
42
-
43
-
44
-
45
-
46
-
47
-
48
-
49
-
50
-
51
-
52
-
53
-
54
-
55
-
56
-
57
-
58
-
59
-
60
-
61
-
62
-
63
-
64
-
65
-
66
-
67
-
68
-
69
-
70
-
71
-
72
-
73
-
74
-
75
-
76
-
77
-
78
-
79
-
80
-
81
-
82
-
83
-
84
-
85
-
86
-
87
-
88
-
89
-
90
-
91
-
92
-
93
-
94
-
95
-
96
-
97
-
98
-
99
-
100
-
101
-
102
-
103
-
104
-
105
-
106
-
107
-
108
-
109
-
110
-
111
-
112
-
113
-
114
-
115
-
116
-
117
-
118
-
119
-
120
-
121
-
122
-
 123
123 -
 124
124 -
 125
125 -
 126
126 -
 127
127 -
 128
128 -
 129
129 -
 130
130 -
 131
131 -
 132
132 -
 133
133 -
134
-
135
-
136
-
137
-
138
-
139
-
140
-
141
-
142
-
143
-
144
-
145
-
146
-
147
-
148
-
149
-
150
-
151
-
152
-
153
-
154
-
155
-
156
-
157
-
158
-
159
-
160
-
161
-
162
-
163
-
164
-
165
-
166
-
167
-
168
-
169
-
170
-
171
-
172
-
173
-
174
-
175
-
176
-
177
-
178
-
179
-
180
-
181
-
182
-
183
-
184
-
185
-
186
-
187
-
188
-
189
-
190
-
191
-
192
-
193
-
194
-
195
-
196
-
197
-
198
-
199
-
200
-
201
-
202
-
203
-
204
-
205
-
206
-
207
-
208
-
209
-
210
-
211
-
212
-
213
-
214
-
215
-
216
-
217
-
218
-
219
-
220
-
221
-
222
-
223
-
224
-
225
-
226
-
227
-
228
-
229
-
230
-
231
 |
 |
