Brother International LS2300PRW Users Manual - English and Spanish - Page 19
Sewing with a twin needle Option
 |
View all Brother International LS2300PRW manuals
Add to My Manuals
Save this manual to your list of manuals |
Page 19 highlights
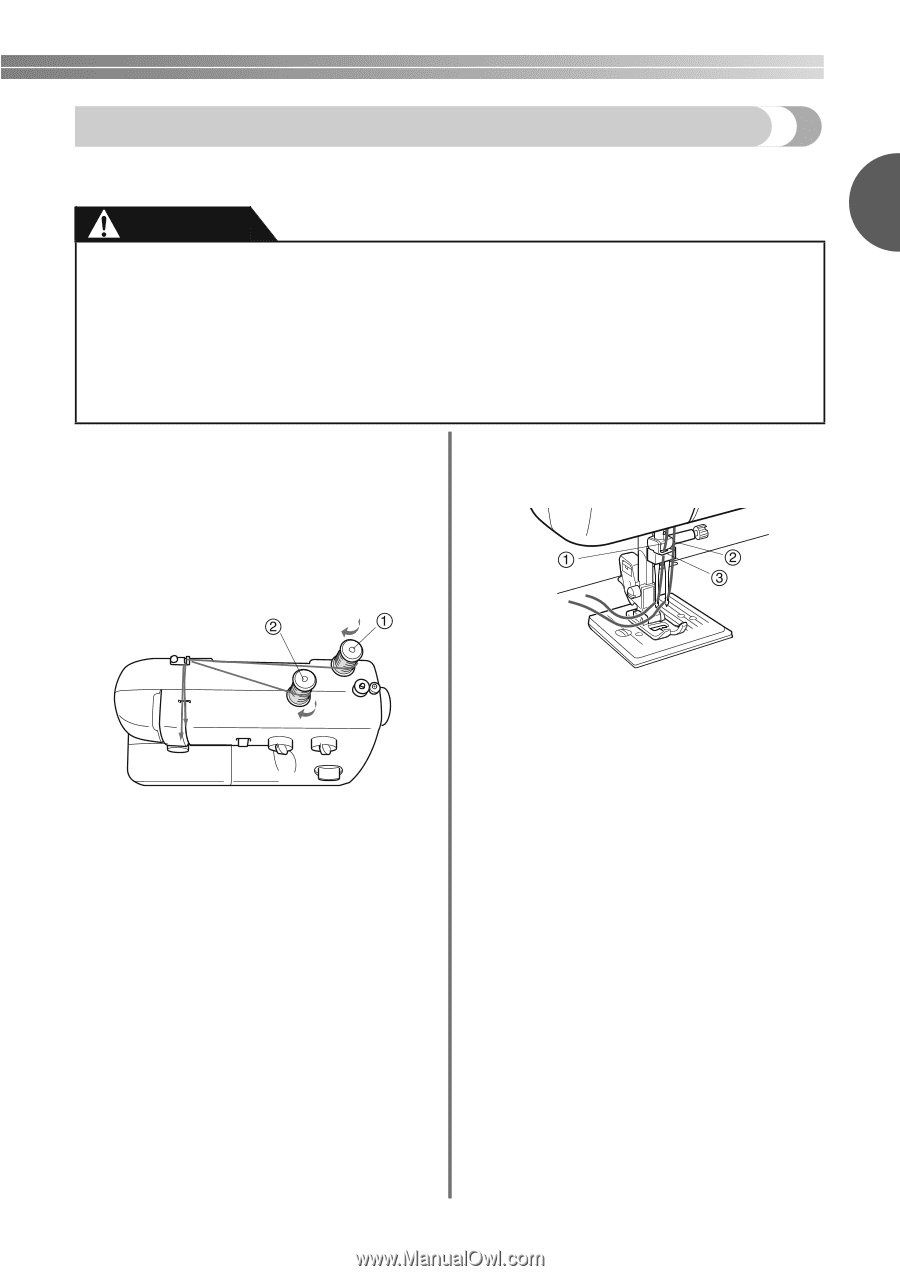
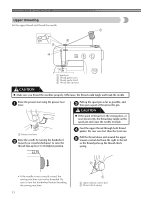
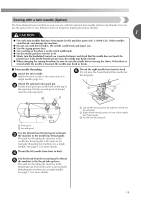
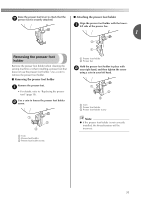
Sewing with a twin needle (Option) We have designed your machine so you can sew with the optional twin needle and two top threads. You can use the same color or two different colors of thread for making decorative stitches. 1 CAUTION ● Use only twin needles that have been made for this machine (part code: 131096-121). Other needles could break, and damage the machine. ● Do not sew with bent needles. The needle could break and injure you. ● Use the zigzag presser foot. ● Use a setting of less than 3 on the stitch width knob. ● Set the needle position selector to M. ● Slowly turn the handwheel toward you (counterclockwise) and check that the needle does not touch the presser foot. If the needle hits the presser foot, the needle may bend or break. ● When changing the sewing direction, be sure to raise the needle before turning the fabric. If the fabric is turned while the needle is lowered, the needle may bend or break. ■ Twin needle threading Attach the twin needle. a Attach the twin needle in the same way as a single needle (page 16). Attach the optional extra spool pin. b Put the extra spool pin in the hole on the top of the machine. Put the second spool of thread onto the extra spool pin. Thread the right needle from front to back. f Do not pass the thread behind the needle bar thread guide. a First spool b Second spool Use the thread from the first spool to thread c the machine to the needle bar thread guide. The path for threading the machine to the needle bar thread guide is the same as for normally threading the machine (for a single needle). See page 13 for more details. Thread the left needle from front to back. d Use the thread from the second spool to thread e the machine to the thread take-up lever. The path for threading the machine to the thread take-up lever is the same as for normally threading the machine (for a single needle). See page 13 for more details. a Left needle thread passes through the needle bar thread guide. b Right needle thread passes in front of the needle bar thread guide. c Needle bar thread guide 18
-
 1
1 -
2
-
3
-
4
-
5
-
6
-
7
-
8
-
9
-
10
-
11
-
12
-
13
-
 14
14 -
 15
15 -
 16
16 -
 17
17 -
 18
18 -
 19
19 -
 20
20 -
 21
21 -
 22
22 -
 23
23 -
 24
24 -
25
-
26
-
27
-
28
-
29
-
30
-
31
-
32
-
33
-
34
-
35
-
36
-
37
-
38
-
39
-
40
-
41
-
42
-
43
-
44
-
45
-
46
-
47
-
48
-
49
-
50
-
51
-
52
-
53
-
54
-
55
-
56
-
57
-
58
-
59
-
60
-
61
-
62
-
63
-
64
-
65
-
66
-
67
-
68
-
69
-
70
-
71
-
72
-
73
-
74
-
75
-
76
-
77
-
78
-
79
-
80
-
81
-
82
-
83
-
84
-
85
-
86
-
87
-
88
-
89
-
90
-
91
-
92
-
93
-
94
-
95
-
96
 |
 |