Brother International LS2300PRW Users Manual - English and Spanish - Page 37
Decorative Stitching
 |
View all Brother International LS2300PRW manuals
Add to My Manuals
Save this manual to your list of manuals |
Page 37 highlights
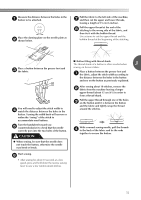
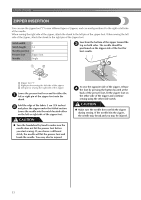
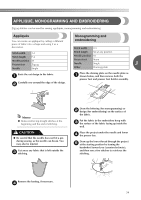
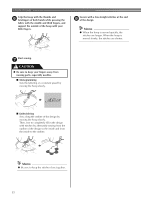
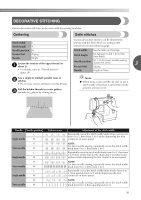
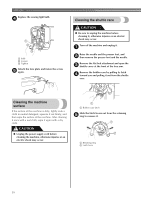
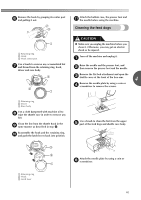
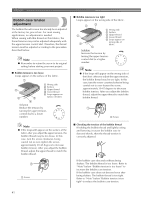
DECORATIVE STITCHING Various decorative stitches can be sewn with this sewing machine. Gathering Stitch width Stitch length Needle position Presser foot Needle 0 4 M Zigzag Single Loosen the tension of the upper thread (to a about 2). • For details, refer to "Thread tension" (page 24). Satin stitches Various decorative stitches can be obtained by sewing with the Satin Stitch according to the instructions on the following page. Stitch width See the table on this page. Stitch length Set between 0 and 1 (F) for the Satin Stitch. Needle position M, L, R (For twin needle sewing, always set at M.) 3 Presser foot Zigzag Needle Single or Twin Sew a single or multiple parallel rows of b stitches. • Do not sew reverse stitches or cut the thread. Pull the bobbin threads to create gathers. c Smooth the gathers by ironing them. Note ● When using a twin needle, be sure to use a stitch width of less than 3 and set the needle position selector to M. Needle Needle position L Single needle M R Twin needle M L Single needle M R Twin needle M L Single needle M R Twin needle M Pattern sewn Adjustment of the stitch width Repeatedly move the stitch width knob at an even speed from 0 to 5, then from 5 to 0 while depressing the foot control at an even speed. NOTE: For twin needle sewing, repeatedly move the stitch width knob from 0 to 3, then from 3 to 0. Repeatedly move the stitch width knob from 0 to 5, then from 5 to 0 more slowly than for the shape above to make round patterns while depressing the foot control at an even speed. NOTE: For twin needle sewing, repeatedly move the stitch width knob from 0 to 3, then from 3 to 0. Repeatedly move the stitch width knob slowly from 0 to 5, then quickly back to 0 while depressing the foot control at an even speed. NOTE: For twin needle sewing, repeatedly move the stitch width knob from 0 to 3, then quickly back to 0. 36
-
 1
1 -
2
-
3
-
4
-
5
-
6
-
7
-
8
-
9
-
10
-
11
-
12
-
13
-
14
-
15
-
16
-
17
-
18
-
19
-
20
-
21
-
22
-
23
-
24
-
25
-
26
-
27
-
28
-
29
-
30
-
31
-
 32
32 -
 33
33 -
 34
34 -
 35
35 -
 36
36 -
 37
37 -
 38
38 -
 39
39 -
 40
40 -
 41
41 -
 42
42 -
43
-
44
-
45
-
46
-
47
-
48
-
49
-
50
-
51
-
52
-
53
-
54
-
55
-
56
-
57
-
58
-
59
-
60
-
61
-
62
-
63
-
64
-
65
-
66
-
67
-
68
-
69
-
70
-
71
-
72
-
73
-
74
-
75
-
76
-
77
-
78
-
79
-
80
-
81
-
82
-
83
-
84
-
85
-
86
-
87
-
88
-
89
-
90
-
91
-
92
-
93
-
94
-
95
-
96
 |
 |
