Brother International MFC-9125CN Quick Setup Guide - English
Brother International MFC-9125CN Manual
 |
View all Brother International MFC-9125CN manuals
Add to My Manuals
Save this manual to your list of manuals |
Brother International MFC-9125CN manual content summary:
- Brother International MFC-9125CN | Quick Setup Guide - English - Page 1
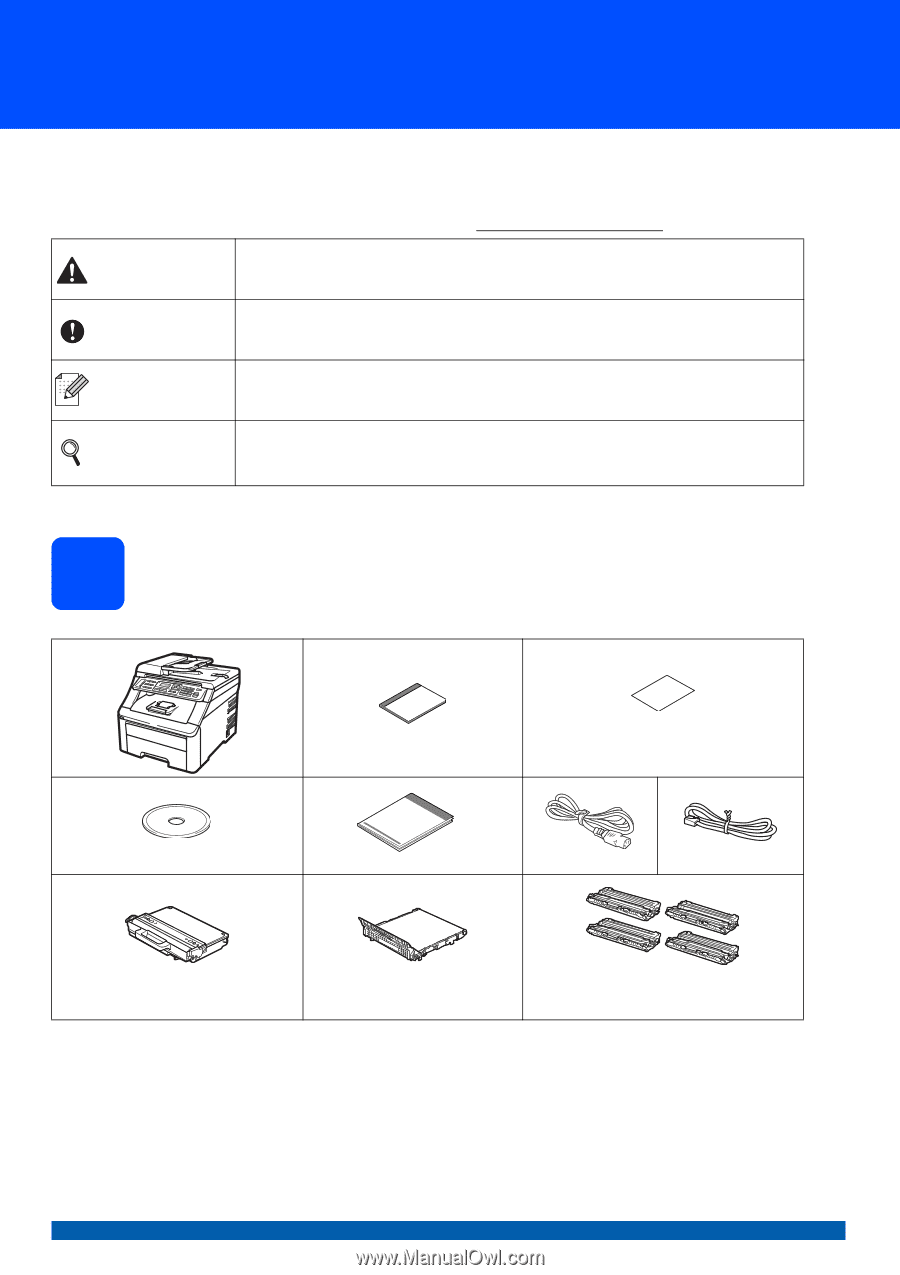
have supplied. 1 Unpack the machine and check the components CD-ROM Waste Toner Box (pre-installed) User's Guide Product Registration Sheet (USA only) Quick Setup Guide AC Power Cord Telephone Line Cord Belt Unit (pre-installed) Drum Unit and Starter Toner Cartridge Assemblies (Black, Cyan - Brother International MFC-9125CN | Quick Setup Guide - English - Page 2
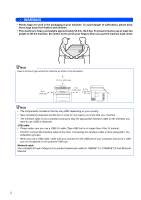
and the box in case for any reason you must ship your machine. • The interface cable is not a standard accessory. Buy the appropriate is no longer than 6 feet (2 meters). • DO NOT connect the interface cable at this time. Connecting the interface cable is done during MFL-Pro installation process. • - Brother International MFC-9125CN | Quick Setup Guide - English - Page 3
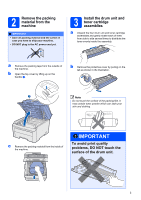
you have to ship your machine. • DO NOT plug in the AC power cord yet. 3 Install the drum unit and toner cartridge assemblies a Unpack the four drum unit and toner cartridge assemblies and gently shake each of them from side to side several times to distribute the toner evenly inside the assembly - Brother International MFC-9125CN | Quick Setup Guide - English - Page 4
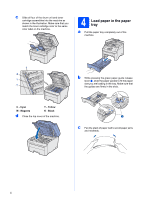
. Make sure that you match the toner cartridge color to the same color label on the machine. 4 Load paper in the paper tray a Pull the paper tray completely out of the machine. C M Y K b While pressing the green paper-guide release lever a, slide the paper guides to fit the paper size you are - Brother International MFC-9125CN | Quick Setup Guide - English - Page 5
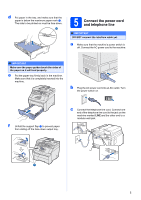
a. The side to be printed on must be face down. 5 Connect the power cord and telephone line IMPORTANT DO NOT connect the interface cable yet. a Make sure that the machine's power switch is off. Connect the AC power cord to the machine. IMPORTANT Make sure the paper guides touch the sides of the - Brother International MFC-9125CN | Quick Setup Guide - English - Page 6
cap a from the EXT. jack on the machine. 1 Set the receive mode to External TAD if you have an external answering machine. See Choose the correct Receive Mode on page 8. For additional details, see Connecting an external TAD (telephone answering device) in Chapter 7 of the User's Guide. 6 - Brother International MFC-9125CN | Quick Setup Guide - English - Page 7
6 Choose your language (if needed) a Press Menu, 0, 0. Initial Setup 0.Local Language b Press a or b to choose your language. Press OK. c Press Stop/Exit. 7 - Brother International MFC-9125CN | Quick Setup Guide - English - Page 8
expect to receive very few faxes? Choose Manual as your receive mode. You control the phone line and must answer every call yourself. See the instructions below. For details, see Using receive modes in Chapter 6 of the User's Guide. a Press Menu, 0, 1. Initial Setup 1.Receive Mode b Press a or b to - Brother International MFC-9125CN | Quick Setup Guide - English - Page 9
Menu, 1, 6. General Setup 6.LCD Contrast b Press a to increase the contrast. -OR- Press b to decrease the contrast. Press OK. c Press Stop/Exit. 9 Set the date and time The machine displays the time, and if you set up the station ID the date and time will be added to each fax you send. a Press - Brother International MFC-9125CN | Quick Setup Guide - English - Page 10
was successful. If you want to use the Fax Transmission Report feature see Chapter 11 Printing reports in the User's Guide. 12 Set tone or pulse dialing mode (Canada only) Your machine comes set for Tone dialing service. If you have Pulse dialing service (rotary), you need to change the dialing mode - Brother International MFC-9125CN | Quick Setup Guide - English - Page 11
/Exit. 14 Automatic Daylight Savings Time You can set the machine to change automatically for daylight savings time. It will reset itself forward one hour in the Spring and backward one hour in the Fall. a Press Menu, 1, 4. General Setup 4.Auto Daylight b Press a or b to choose On (or Off). Press - Brother International MFC-9125CN | Quick Setup Guide - English - Page 12
12 - Brother International MFC-9125CN | Quick Setup Guide - English - Page 13
Windows® Macintosh Wired Network 16 Choose your connection type For USB Interface Users Windows®, go to page 14 Macintosh, go to page 18 For Wired Network Windows®, go to page 20 Macintosh, go to page 25 Note For Windows Server® 2003/ 2008, see the Network User's Guide on the CD-ROM. For Wireless - Brother International MFC-9125CN | Quick Setup Guide - English - Page 14
software supports Windows® XP (SP2 or greater), XP Professional x64 Edition, Windows Vista® and Windows® 7. Update to the latest Windows® Service Pack before installing MFL-Pro Suite. b Turn off and unplug the machine from the AC outlet and disconnect it from your computer, if you already connected - Brother International MFC-9125CN | Quick Setup Guide - English - Page 15
driver (Brother's BR-Script Driver), choose Custom Install and then follow the on-screen instructions. When the Select Features screen appears, check PS Printer Driver, and then continue following the on-screen instructions. h If you do not want to monitor the machine status and error notification - Brother International MFC-9125CN | Quick Setup Guide - English - Page 16
the USB cable to the USB connector on the machine marked with the symbol. Then connect the cable to your computer. b When the On-Line Registration screen is displayed, make your selection and follow the on-screen instructions. Once you have completed the registration process, close your web browser - Brother International MFC-9125CN | Quick Setup Guide - English - Page 17
Specification Printer Driver The XML Paper Specification Printer Driver is the most suitable driver for Windows Vista® and Windows® 7 when printing from the applications that use the XML Paper Specification documents. Please download the latest driver by accessing the Brother Solutions Center at - Brother International MFC-9125CN | Quick Setup Guide - English - Page 18
Then connect the cable to your computer. 19 Install MFL-Pro Suite a Put the supplied CD-ROM into your CD-ROM drive. b Double-click the Start Here OSX icon. Follow the on-screen instructions. Note Please see the Software User's Guide on the CD-ROM if you want to install the PS driver. (Brother's BR - Brother International MFC-9125CN | Quick Setup Guide - English - Page 19
d Follow the on-screen instructions until this screen appears. Choose your machine from the list, and then click OK. Macintosh 20 Download and install Presto! PageManager When Presto! PageManager is installed OCR capability is added to Brother ControlCenter2. You can easily scan, share and organize - Brother International MFC-9125CN | Quick Setup Guide - English - Page 20
Windows® Service Pack before installing MFL-Pro Suite. IMPORTANT Disable all personal firewall software (other than Windows® Firewall), anti-spyware or antivirus applications for the duration of the installation. b Unplug the machine from the AC outlet. 18 Connect the network cable a Connect the - Brother International MFC-9125CN | Quick Setup Guide - English - Page 21
If the model name screen appears, choose your machine. If the language screen appears, choose your language. User Account Control screen appears, click Allow or Yes. Note If the Brother screen does not appear automatically, go to My Computer (Computer), double-click the CD-ROM icon, and then double - Brother International MFC-9125CN | Quick Setup Guide - English - Page 22
, see the User's Guide for your software for information on how to add the following network ports. For network scanning, add UDP port 54925. For network PC-Fax receiving, add UDP port 54926. If you still have trouble with your network connection, add UDP port 137. i If the machine is - Brother International MFC-9125CN | Quick Setup Guide - English - Page 23
instructions. Once you have completed the registration process, close your web browser to return to this window. Then click Next. Note If an error message appears during the software installation, run the Installation Diagnostics located in Start/All Programs/Brother/ MFC-XXXX LAN (where MFC - Brother International MFC-9125CN | Quick Setup Guide - English - Page 24
Specification Printer Driver The XML Paper Specification Printer Driver is the most suitable driver for Windows Vista® and Windows® 7 when printing from the applications that use the XML Paper Specification documents. Please download the latest driver by accessing the Brother Solutions Center at - Brother International MFC-9125CN | Quick Setup Guide - English - Page 25
-ROM into your CD-ROM drive. b Double-click the Start Here OSX icon. Follow the on-screen instructions. Note Please see the Network User's Guide on the CD-ROM if you want to install the PS driver. (Brother's BR-Script Driver) c Choose Wired Network Connection (Ethernet), and then click Next. Follow - Brother International MFC-9125CN | Quick Setup Guide - English - Page 26
using Presto! PageManager. On the Brother Support screen, click Presto! PageManager and follow the on-screen instructions. • If you want to use the machine's SCAN key to scan over the network, you must check the Register your computer with the "Scan To" function on the machine box. • The name you - Brother International MFC-9125CN | Quick Setup Guide - English - Page 27
will have access to the machine. To use the machine from these computers, you will need to install the drivers and software. The following steps will guide you through the configuration and installation process. IMPORTANT • If you are going to connect the printer to your network, we recommend - Brother International MFC-9125CN | Quick Setup Guide - English - Page 28
offer three methods for installing your Brother machine in a wireless network environment. Choose the method you prefer for your environment. Note To setup your machine in any other wireless environment, you can find instructions in the Network User's Guide. a Configuration using the Installation CD - Brother International MFC-9125CN | Quick Setup Guide - English - Page 29
Users b Manual configuration from the control panel If your wireless access point/router does not support Wi-Fi Protected Setup lets the Brother wireless machine associate with supported for WPA-PSK only 4 Encryption key, WEP key, Passphrase For LEAP and EAP-FAST, record the User Name and Password - Brother International MFC-9125CN | Quick Setup Guide - English - Page 30
For Wireless Network Users c One push configuration using Wi-Fi Protected Setup or AOSS™ If your wireless access point/router supports automatic wireless (one-push) setup (Wi-Fi Protected Setup or AOSS™) Now go to page 38 30 - Brother International MFC-9125CN | Quick Setup Guide - English - Page 31
, see the user's guide of your firewall or antivirus software for information on how to add the following network ports. For network scanning, add UDP port 54925. For network PC-Fax receiving, add UDP port 54926. If you still have trouble with your network connection, add UDP port - Brother International MFC-9125CN | Quick Setup Guide - English - Page 32
, and then see if the machine and the access point are within range for wireless communication. Then, click Refresh. • If your access point is set to not broadcast the SSID you can manually add it by clicking the Advanced button. Follow the on-screen instructions for entering the Name (SSID), and - Brother International MFC-9125CN | Quick Setup Guide - English - Page 33
will remain unchanged if you click Cancel. • If you want to manually enter the IP address settings of your machine, click Change IP Address and enter the necessary IP address settings for your network. • If the wireless setup failure screen appears, click Retry. o Disconnect the USB cable between - Brother International MFC-9125CN | Quick Setup Guide - English - Page 34
a USB cable (For Macintosh Users) 19 Configure the wireless settings e Read the Important Notice. Check the box after you confirm Connection and then click Next. g Temporarily connect the USB cable (not included) directly to the computer and the machine. d Choose Use your computer or the control - Brother International MFC-9125CN | Quick Setup Guide - English - Page 35
instructions for entering the Name (SSID), and then click Next. Note • The settings will remain unchanged if you click Cancel. • If you want to manually enter the IP address settings of your machine Suite. Wireless setup is now complete. A four level indicator at the right of your machine's LCD - Brother International MFC-9125CN | Quick Setup Guide - English - Page 36
Users Manual configuration from the control panel 19 Configure the wireless settings IMPORTANT You must have the wireless settings you wrote down for your network in step 18-b on page 29 before you proceed. a On your machine, press Menu, 7 (Network), 2 (WLAN), 2 (Setup to choose one of the - Brother International MFC-9125CN | Quick Setup Guide - English - Page 37
dial pad once. Enter the password and press OK, and then Connected will appear briefly on the LCD. If your machine does not successfully connect manually configure the IP address, subnet mask and gateway of the machine to suit your network. See the Network User's Guide for details. Wireless setup - Brother International MFC-9125CN | Quick Setup Guide - English - Page 38
. See the user's guide for your WLAN access point/router for instructions. This feature will automatically detect which mode (Wi-Fi Protected Setup or AOSS™) your access point/router uses to configure your machine. Note If your wireless access point/router supports Wi-Fi Protected Setup (PIN Method - Brother International MFC-9125CN | Quick Setup Guide - English - Page 39
Wireless Network Users Wireless setup is now complete. A four level indicator at the right of your machine's LCD will show the wireless signal strength of your access point/router. To install the MFL-Pro Suite, continue to; For Windows® Users: Now go to step 20 on page 40 For Macintosh Users: Now go - Brother International MFC-9125CN | Quick Setup Guide - English - Page 40
® Firewall, see the user's guide of your firewall or antivirus software for information on how to add the following network ports. For network scanning, add UDP port 54925. For network PC-Fax receiving, add UDP port 54926. If you still have trouble with your network connection, add UDP port - Brother International MFC-9125CN | Quick Setup Guide - English - Page 41
Paper Specification Printer Driver The XML Paper Specification Printer Driver is the most suitable driver for Windows Vista® and Windows® 7 when printing from applications that use the XML Paper Specification documents. Please download the latest driver by accessing the Brother Solutions Center at - Brother International MFC-9125CN | Quick Setup Guide - English - Page 42
on the Mac OS X you are using, visit http://solutions.brother.com/.) Note If you want to install the PS driver (BR-Script3 printer driver), please go to the Brother Solutions Center at http://solutions.brother.com/ and click Downloads on your model page and visit FAQ's for setup instructions. 21 - Brother International MFC-9125CN | Quick Setup Guide - English - Page 43
using Presto! PageManager. On the Brother Support screen, click Presto! PageManager and follow the on-screen instructions. • If you want to use the machine's SCAN key to scan over the network, you must check the Register your computer with the "Scan To" function on the machine box. • The name you - Brother International MFC-9125CN | Quick Setup Guide - English - Page 44
settings of the internal Print/Scan server to factory default, please follow the steps below. a Make sure the machine is not operating, then disconnect all the cables from the machine (except the power cord). b Press Menu, 7, 0. Network 0.Network Reset c Press 1 to choose Reset. d Press 1 to choose - Brother International MFC-9125CN | Quick Setup Guide - English - Page 45
For Network Users Entering Text for Wireless Settings Most number keys have three or four letters printed on them. The keys for 0, # and l do not have printed letters because they are used for special characters. By pressing the proper number key repeatedly, you can access the character you want. - Brother International MFC-9125CN | Quick Setup Guide - English - Page 46
at http://www.brother.com/original/ or contact your local Brother reseller. Toner cartridges TN-210C/TN-210M/TN-210Y/TN-210BK Drum units DR-210CL 1 Belt Unit (BU-200CL) Waste Toner Box (WT-200CL) 1 Contains a set of three color drums and one black drum. All four drums are replaced at the same - Brother International MFC-9125CN | Quick Setup Guide - English - Page 47
WPA2, Wi-Fi Protected Access and Wi-Fi Protected Setup are either trademarks or registered trademarks of Wi-Fi Alliance supervision of Brother Industries, Ltd., this manual has been errors relating to the publication. Copyright and License ©2011 Brother Industries, Ltd. This product includes software
-
 1
1 -
 2
2 -
 3
3 -
 4
4 -
 5
5 -
 6
6 -
 7
7 -
8
-
9
-
10
-
11
-
12
-
13
-
14
-
15
-
16
-
17
-
18
-
19
-
20
-
21
-
22
-
23
-
24
-
25
-
26
-
27
-
28
-
29
-
30
-
31
-
32
-
33
-
34
-
35
-
36
-
37
-
38
-
39
-
40
-
41
-
42
-
43
-
44
-
45
-
46
-
47
 |
 |
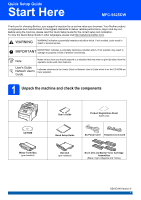
1
Start Here
MFC-9325CW
Quick Setup Guide
USA/CAN Version 0
Thank you for choosing Brother, your support is important to us and we value your business. Your Brother product
is engineered and manufactured to the highest standards to deliver reliable performance, day-in and day-out.
Before using the machine, please read this Quick Setup Guide for the correct setup and installation.
To view the Quick Setup Guide in other languages, please visit http://solutions.brother.com/
.
1
Unpack the machine and check the components
WARNING
WARNING indicates a potentially hazardous situation which, if not avoided, could result in
death or serious injuries.
IMPORTANT
IMPORTANT indicates a potentially hazardous situation which, if not avoided, may result in
damage to property or loss of product functionality.
Note
Notes tell you how you should respond to a situation that may arise or give tips about how the
operation works with other features.
User's Guide
Network User's
Guide
Indicates reference to the User's Guide or Network User's Guide which is on the CD-ROM we
have supplied.
User’s Guide
Product Registration Sheet
(USA only)
CD-ROM
Quick Setup Guide
AC Power Cord
Telephone Line Cord
Waste Toner Box
(pre-installed)
Belt Unit
(pre-installed)
Drum Unit and Starter Toner Cartridge
Assemblies
(Black, Cyan, Magenta and Yellow)