Brother International MFC-9125CN Quick Setup Guide - English - Page 16
Connect the USB cable, 20 Connect the power cord, b - check connection
 |
View all Brother International MFC-9125CN manuals
Add to My Manuals
Save this manual to your list of manuals |
Page 16 highlights
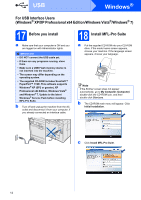
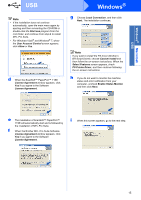
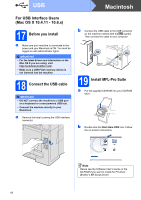
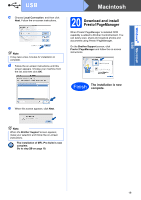
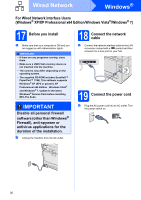
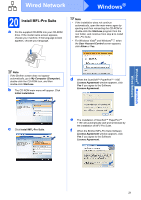
USB Windows® 19 Connect the USB cable IMPORTANT • DO NOT connect the machine to a USB port on a keyboard or a non-powered USB hub. • Connect the machine directly to your computer. a Remove the label covering the USB interface connector. 20 Connect the power cord a Plug the AC power cord into an AC outlet. Turn the power switch on. The installation will continue automatically. The installation screens appear one after another. IMPORTANT DO NOT cancel any of the screens during the installation. It may take a few seconds for all screens to appear. Note For Windows Vista® and Windows® 7, when this screen appears, click the check box and click Install to complete the installation correctly. b Connect the USB cable to the USB connector on the machine marked with the symbol. Then connect the cable to your computer. b When the On-Line Registration screen is displayed, make your selection and follow the on-screen instructions. Once you have completed the registration process, close your web browser to return to this window. Then click Next. 16
-
 1
1 -
2
-
3
-
4
-
5
-
6
-
7
-
8
-
9
-
10
-
 11
11 -
 12
12 -
 13
13 -
 14
14 -
 15
15 -
 16
16 -
 17
17 -
 18
18 -
 19
19 -
 20
20 -
 21
21 -
22
-
23
-
24
-
25
-
26
-
27
-
28
-
29
-
30
-
31
-
32
-
33
-
34
-
35
-
36
-
37
-
38
-
39
-
40
-
41
-
42
-
43
-
44
-
45
-
46
-
47
 |
 |
