Brother International MFC-J6520DW Basic Users Guide - Page 28
Adding Scan Shortcuts, l
 |
View all Brother International MFC-J6520DW manuals
Add to My Manuals
Save this manual to your list of manuals |
Page 28 highlights
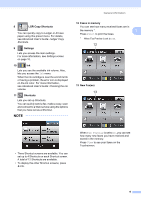
Chapter 1 e Read the information on the Touchscreen, and then confirm it by pressing OK. f Enter the fax number using the dial pad on the Touchpanel, or the Address Book or Call History on the Touchscreen. When you are finished, go to step g. NOTE • You can enter up to 20 digits for a fax number. • If the Shortcut is to be used for broadcasting, press Options and choose Broadcasting in step h before entering the fax number in step f. • You can enter up to 20 fax numbers if the Shortcut is for broadcasting. The fax numbers can be entered in any combination of Group numbers from the Address Book and individual fax numbers from the Address Book or entered manually. (See Advanced User's Guide: Broadcasting (Black & White only).) • When you enter a fax number in a Shortcut, it will be added to the Address Book. The name in the Address Book will be the Shortcut name plus a sequential number. g Press Options. h Press a or b to display the available settings, and then press the setting you want to change. i Press the new option you want to set. Repeat steps h and i until you have chosen all the settings for this Shortcut. Press OK. j When you are finished choosing new options, press Save as Shortcut. k Read and confirm the displayed list of options you have chosen, and then press OK. l Enter a name for the Shortcut using the keyboard on the Touchscreen. (For help entering letters, see Entering Text on page 186.) Press OK. m Press OK to save your Shortcut. Adding Scan Shortcuts 1 The following settings can be included in a scan Shortcut: to Media ADF HighSpeed Mode Scan Type Resolution File Type Scan Size Scan Long Paper File Name Auto Crop Remove Background Color to E-mail Server (Available after IFAX has been downloaded) Address ADF HighSpeed Mode Scan Type Resolution File Type Scan Size Scan Long Paper to File/to OCR/to Image/to E-mail PC Select to FTP/to Network Profile Name 14
-
 1
1 -
2
-
3
-
4
-
5
-
6
-
7
-
8
-
9
-
10
-
11
-
12
-
13
-
14
-
15
-
16
-
17
-
18
-
19
-
20
-
21
-
22
-
 23
23 -
 24
24 -
 25
25 -
 26
26 -
 27
27 -
 28
28 -
 29
29 -
 30
30 -
 31
31 -
 32
32 -
 33
33 -
34
-
35
-
36
-
37
-
38
-
39
-
40
-
41
-
42
-
43
-
44
-
45
-
46
-
47
-
48
-
49
-
50
-
51
-
52
-
53
-
54
-
55
-
56
-
57
-
58
-
59
-
60
-
61
-
62
-
63
-
64
-
65
-
66
-
67
-
68
-
69
-
70
-
71
-
72
-
73
-
74
-
75
-
76
-
77
-
78
-
79
-
80
-
81
-
82
-
83
-
84
-
85
-
86
-
87
-
88
-
89
-
90
-
91
-
92
-
93
-
94
-
95
-
96
-
97
-
98
-
99
-
100
-
101
-
102
-
103
-
104
-
105
-
106
-
107
-
108
-
109
-
110
-
111
-
112
-
113
-
114
-
115
-
116
-
117
-
118
-
119
-
120
-
121
-
122
-
123
-
124
-
125
-
126
-
127
-
128
-
129
-
130
-
131
-
132
-
133
-
134
-
135
-
136
-
137
-
138
-
139
-
140
-
141
-
142
-
143
-
144
-
145
-
146
-
147
-
148
-
149
-
150
-
151
-
152
-
153
-
154
-
155
-
156
-
157
-
158
-
159
-
160
-
161
-
162
-
163
-
164
-
165
-
166
-
167
-
168
-
169
-
170
-
171
-
172
-
173
-
174
-
175
-
176
-
177
-
178
-
179
-
180
-
181
-
182
-
183
-
184
-
185
-
186
-
187
-
188
-
189
-
190
-
191
-
192
-
193
-
194
-
195
-
196
-
197
-
198
-
199
-
200
-
201
-
202
-
203
-
204
-
205
-
206
-
207
-
208
-
209
-
210
-
211
-
212
-
213
-
214
-
215
-
216
-
217
-
218
-
219
 |
 |
