Brother International S-7200C Instruction Manual - English - Page 46
Adjusting the needle up stop position
 |
View all Brother International S-7200C manuals
Add to My Manuals
Save this manual to your list of manuals |
Page 46 highlights
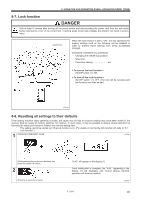
8. USING THE G10 OPERATION PANEL (ADVANCED OPERATIONS) 8-6. Adjusting the needle up stop position 1 4217M 2138M (While pressing the 2 Selecting "UPoS" key (1), press the power ON switch.) (Setting item) "MorG" will appear in the display (2). (Press once) 3 Needle up stop position setting (Setting value) Example: Becomes higher Becomes lower 4218M ・ If you press the key, the setting value will increase and the needle up stop position will become lower. ・ If you press the key, the setting value will decrease and the needle up stop position will become higher. ・ The setting range is from -10 to 10. * A setting value of "10" corresponds to an angle of rotation of approximately 10° for the upper shaft. 4219M 2138M 2139M 4 (Setting item) The setting will be stored and the display will return to the setting item. 4220M 5 Normal sewing machine operation will then be possible. * For details on other adjustment items, refer to the Service Manual. 4206M 39 S-7200C
-
 1
1 -
2
-
3
-
4
-
5
-
6
-
7
-
8
-
9
-
10
-
11
-
12
-
13
-
14
-
15
-
16
-
17
-
18
-
19
-
20
-
21
-
22
-
23
-
24
-
25
-
26
-
27
-
28
-
29
-
30
-
31
-
32
-
33
-
34
-
35
-
36
-
37
-
38
-
39
-
40
-
 41
41 -
 42
42 -
 43
43 -
 44
44 -
 45
45 -
 46
46 -
 47
47 -
 48
48 -
 49
49 -
 50
50 -
 51
51 -
52
-
53
-
54
-
55
-
56
-
57
-
58
-
59
-
60
-
61
-
62
-
63
-
64
-
65
-
66
-
67
-
68
-
69
-
70
-
71
-
72
-
73
-
74
-
75
-
76
-
77
-
78
-
79
-
80
 |
 |
