Brother International S-7200C Instruction Manual - English - Page 69
Adjusting the treadle
 |
View all Brother International S-7200C manuals
Add to My Manuals
Save this manual to your list of manuals |
Page 69 highlights
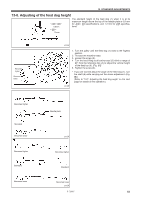
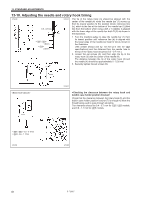
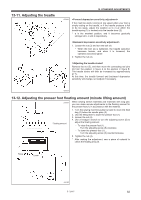
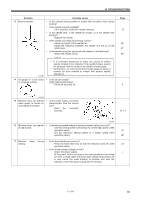
13-11. Adjusting the treadle 13. STANDARD ADJUSTMENTS 4259M If the machine starts running at low speed when your foot is simply resting on the treadle, or if the treadle pressure is felt to be too weak, adjust the position (a to c) at which the treadle spring (1) is hooked onto the treadle lever (2). * a is the weakest position, and it becomes gradually stronger at b, c and d respectively. 1. Loosen the nut (3) and turn the bolt (4). * When the bolt (4) is tightened, the treadle operation becomes heavier, and when it is loosened, the operation becomes lighter. 2. Tighten the nut (3). Remove the nut (5), and then move the connecting rod joint (6) from the position in figure A to the position in figure B. The treadle stroke will then be increased by approximately 27 %. At this time, the treadle forward and backward depression sensitivity will change, so readjust if necessary. 4260M 13-12. Adjusting the presser foot floating amount (minute lifting amount) 2307M When sewing stretch materials and materials with long pile, you can make minute adjustments to the floating amount for the presser foot (1) in accordance with the material. Floating amount 1. Turn the sewing machine pulley by hand to move the feed dog (2) below the needle plate (3). 2. Use the lifting lever to lower the presser foot (1). 3. Loosen the nut (4). 4. Use a hexagon wrench to turn the adjusting screw (5) to adjust the floating amount. ・ To raise the presser foot (1) ... Turn the adjusting screw (5) clockwise. ・ To lower the presser foot (1) ... Turn the adjusting screw (5) counterclockwise. 5. Tighten the nut (4). * After making the adjustment, sew a piece of material to check the floating amount. Raise Lower 4310M S-7200C 62
-
 1
1 -
2
-
3
-
4
-
5
-
6
-
7
-
8
-
9
-
10
-
11
-
12
-
13
-
14
-
15
-
16
-
17
-
18
-
19
-
20
-
21
-
22
-
23
-
24
-
25
-
26
-
27
-
28
-
29
-
30
-
31
-
32
-
33
-
34
-
35
-
36
-
37
-
38
-
39
-
40
-
41
-
42
-
43
-
44
-
45
-
46
-
47
-
48
-
49
-
50
-
51
-
52
-
53
-
54
-
55
-
56
-
57
-
58
-
59
-
60
-
61
-
62
-
63
-
 64
64 -
 65
65 -
 66
66 -
 67
67 -
 68
68 -
 69
69 -
 70
70 -
 71
71 -
 72
72 -
 73
73 -
 74
74 -
75
-
76
-
77
-
78
-
79
-
80
 |
 |
