Canon CanoScan D1250U2F CanoScan D1250U2F Quick Start Guide - Page 19
How to Scan Film
 |
View all Canon CanoScan D1250U2F manuals
Add to My Manuals
Save this manual to your list of manuals |
Page 19 highlights
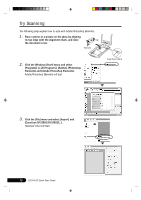
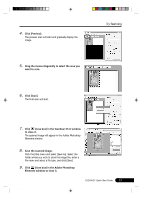
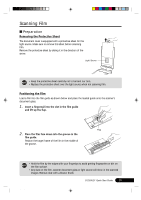
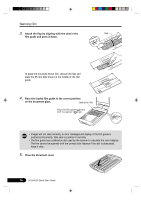
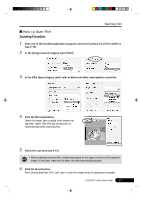
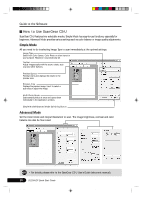
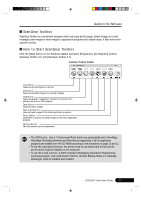
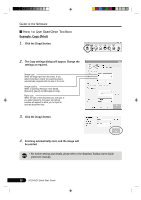
Scanning Film How to Scan Film Scanning Procedure 1. Start one of the bundled application programs and start ScanGear CS-U from within it (see P. 19). 2. In the [Image Source] category, select [Film]. 3. In the [Film Type] category, select color or black and white, and negative or positive. 4. Click the [Preview] button. Select the Image Type or adjust color balance as required. Higher than 600 dpi of resolution is recommended when scanning film. 5. Select the scan area (see P. 13). • When scanning mounted film, stripes may appear at the upper or lower of the scanned image. In this case, make sure to select the scan area avoiding stripes. 6. Click the [Scan] button. After closing ScanGear CS-U, edit, save or print the image using the application program. D1250U2F Quick Start Guide 17 *D1250U2F_QSG_E 17 11/24/01, 7:19 AM
-
 1
1 -
2
-
3
-
4
-
5
-
6
-
7
-
8
-
9
-
10
-
11
-
12
-
13
-
 14
14 -
 15
15 -
 16
16 -
 17
17 -
 18
18 -
 19
19 -
 20
20 -
 21
21 -
 22
22 -
 23
23 -
 24
24 -
25
-
26
-
27
-
28
-
29
-
30
 |
 |
