Canon CanoScan D1250U2F CanoScan D1250U2F Quick Start Guide - Page 20
Using the PHOTO Button
 |
View all Canon CanoScan D1250U2F manuals
Add to My Manuals
Save this manual to your list of manuals |
Page 20 highlights
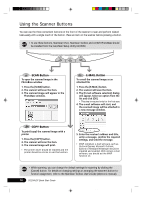
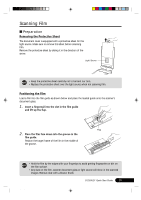
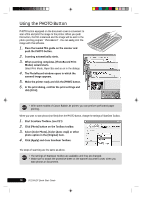
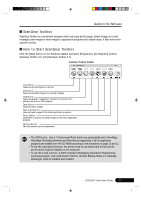
Using the PHOTO Button PHOTO button equipped on the document cover is convenient to scan a film and print the image to the printer. When you push this button, the film is scanned and the image will be sent to the photo printing program "PhotoRecord". You can easily print the image with this software. 1. Place the loaded film guide on the scanner and push the PHOTO button. 2. Scanning automatically starts. 3. When scanning completes, [PhotoRecord Print Modes] wizard starts. Select Print Mode, Paper Size and so on in the dialogs. 4. The PhotoRecord window opens in which the scanned image appears. 5. Make the printer ready and click the [PRINT] button. 6. In the print dialog, confirm the print settings and click [Print]. • With some models of Canon Bubble Jet printer, you can perform perforated paper printing. When you want to scan photos (not films) from the PHOTO button, change the settings of ScanGear Toolbox. 1. Start ScanGear Toolbox. (see P.21) 2. Click [Photo] button on the Toolbox toolbar. 3. Select [Color Photo], [Color (Auto crop)] or other photo option in the [Original] item. 4. Click [Apply] and close ScanGear Toolbox. The steps of scanning are the same as above. • The settings of ScanGear Toolbox are available until they are changed. • Make sure to attach the protective sheet on the scanner document cover, when you scan photos or documents. 18 D1250U2F Quick Start Guide *D1250U2F_QSG_E 18 11/24/01, 7:19 AM
-
 1
1 -
2
-
3
-
4
-
5
-
6
-
7
-
8
-
9
-
10
-
11
-
12
-
13
-
14
-
 15
15 -
 16
16 -
 17
17 -
 18
18 -
 19
19 -
 20
20 -
 21
21 -
 22
22 -
 23
23 -
 24
24 -
 25
25 -
26
-
27
-
28
-
29
-
30
 |
 |
