Canon EOS 70D User Manual - Page 105
Start EOS Utility on the computer, log in to CANON, Connect the camera and computer with an interface - 2013
 |
View all Canon EOS 70D manuals
Add to My Manuals
Save this manual to your list of manuals |
Page 105 highlights
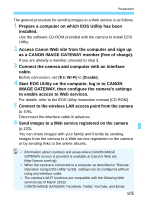
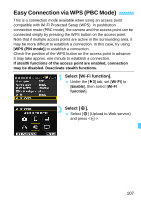
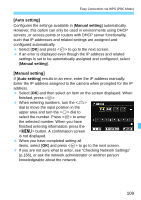
Preparation The general procedure for sending images to a Web service is as follows. 1 Prepare a computer on which EOS Utility has been installed. Use the software CD-ROM provided with the camera to install EOS Utility. 2 Access Canon Web site from the computer and sign up as a CANON iMAGE GATEWAY member (free of charge). If you are already a member, proceed to step 3. 3 Connect the camera and computer with an interface cable. Before connection, set [53: Wi-Fi] to [Disable]. 4 Start EOS Utility on the computer, log in to CANON iMAGE GATEWAY, then configure the camera's settings to enable access to Web services. For details, refer to the EOS Utility instruction manual (CD-ROM). 5 Connect to the wireless LAN access point from the camera (p.106). Disconnect the interface cable in advance. 6 Send images to a Web service registered on the camera (p.120). You can share images with your family and friends by sending images from the camera to a Web service registered on the camera or by sending links to the online albums. Information about countries and areas where CANON iMAGE GATEWAY service is provided is available at Canon's Web site (http://canon.com/cig). When the camera is connected to a computer as described in "Remote Operation Using EOS Utility" (p.93), settings can be configured without using any interface cable. The camera's Wi-Fi functions are compatible with the following Web services (as of March 2013): CANON iMAGE GATEWAY, Facebook, Twitter, YouTube, and Email. 105
-
 1
1 -
2
-
3
-
4
-
5
-
6
-
7
-
8
-
9
-
10
-
11
-
12
-
13
-
14
-
15
-
16
-
17
-
18
-
19
-
20
-
21
-
22
-
23
-
24
-
25
-
26
-
27
-
28
-
29
-
30
-
31
-
32
-
33
-
34
-
35
-
36
-
37
-
38
-
39
-
40
-
41
-
42
-
43
-
44
-
45
-
46
-
47
-
48
-
49
-
50
-
51
-
52
-
53
-
54
-
55
-
56
-
57
-
58
-
59
-
60
-
61
-
62
-
63
-
64
-
65
-
66
-
67
-
68
-
69
-
70
-
71
-
72
-
73
-
74
-
75
-
76
-
77
-
78
-
79
-
80
-
81
-
82
-
83
-
84
-
85
-
86
-
87
-
88
-
89
-
90
-
91
-
92
-
93
-
94
-
95
-
96
-
97
-
98
-
99
-
 100
100 -
 101
101 -
 102
102 -
 103
103 -
 104
104 -
 105
105 -
 106
106 -
 107
107 -
 108
108 -
 109
109 -
 110
110 -
111
-
112
-
113
-
114
-
115
-
116
-
117
-
118
-
119
-
120
-
121
-
122
-
123
-
124
-
125
-
126
-
127
-
128
-
129
-
130
-
131
-
132
-
133
-
134
-
135
-
136
-
137
-
138
-
139
-
140
-
141
-
142
-
143
-
144
-
145
-
146
-
147
-
148
-
149
-
150
-
151
-
152
-
153
-
154
-
155
-
156
-
157
-
158
-
159
-
160
-
161
-
162
-
163
-
164
-
165
-
166
-
167
-
168
-
169
-
170
-
171
-
172
-
173
-
174
 |
 |