Canon EOS 7D Mark II Instruction Manual - Page 122
Setting Exposure Compensation
 |
View all Canon EOS 7D Mark II manuals
Add to My Manuals
Save this manual to your list of manuals |
Page 122 highlights
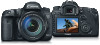
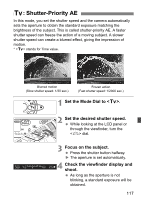
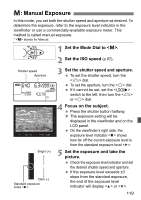
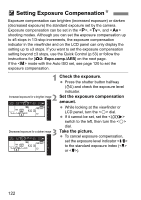
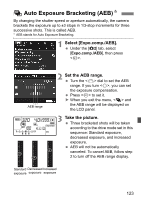
O Setting Exposure CompensationN Exposure compensation can brighten (increased exposure) or darken (decreased exposure) the standard exposure set by the camera. Exposure compensation can be set in the , , and shooting modes. Although you can set the exposure compensation up to ±5 stops in 1/3-stop increments, the exposure compensation indicator in the viewfinder and on the LCD panel can only display the setting up to ±3 stops. If you want to set the exposure compensation setting beyond ±3 stops, use the Quick Control (p.53) or follow the instructions for [z2: Expo.comp./AEB] on the next page. If the mode with the Auto ISO set, see page 120 to set the exposure compensation. 1 Check the exposure. Press the shutter button halfway (0) and check the exposure level indicator. 2 Increased exposure for a brighter image Set the exposure compensation amount. While looking at the viewfinder or LCD panel, turn the dial. If it cannot be set, set the switch to the left, then turn the dial. 3 Decreased exposure for a darker image Take the picture. To cancel exposure compensation, set the exposure level indicator to the standard exposure index ( or ). 122
-
 1
1 -
2
-
3
-
4
-
5
-
6
-
7
-
8
-
9
-
10
-
11
-
12
-
13
-
14
-
15
-
16
-
17
-
18
-
19
-
20
-
21
-
22
-
23
-
24
-
25
-
26
-
27
-
28
-
29
-
30
-
31
-
32
-
33
-
34
-
35
-
36
-
37
-
38
-
39
-
40
-
41
-
42
-
43
-
44
-
45
-
46
-
47
-
48
-
49
-
50
-
51
-
52
-
53
-
54
-
55
-
56
-
57
-
58
-
59
-
60
-
61
-
62
-
63
-
64
-
65
-
66
-
67
-
68
-
69
-
70
-
71
-
72
-
73
-
74
-
75
-
76
-
77
-
78
-
79
-
80
-
81
-
82
-
83
-
84
-
85
-
86
-
87
-
88
-
89
-
90
-
91
-
92
-
93
-
94
-
95
-
96
-
97
-
98
-
99
-
100
-
101
-
102
-
103
-
104
-
105
-
106
-
107
-
108
-
109
-
110
-
111
-
112
-
113
-
114
-
115
-
116
-
 117
117 -
 118
118 -
 119
119 -
 120
120 -
 121
121 -
 122
122 -
 123
123 -
 124
124 -
 125
125 -
 126
126 -
 127
127 -
128
-
129
-
130
-
131
-
132
-
133
-
134
-
135
-
136
-
137
-
138
-
139
-
140
-
141
-
142
-
143
-
144
-
145
-
146
-
147
-
148
-
149
-
150
-
151
-
152
-
153
-
154
-
155
-
156
-
157
-
158
-
159
-
160
-
161
-
162
-
163
-
164
-
165
-
166
-
167
-
168
-
169
-
170
-
171
-
172
-
173
-
174
-
175
-
176
-
177
-
178
-
179
-
180
 |
 |