Canon EOS 7D Mark II Instruction Manual - Page 50
After pressing the <, > button, tilt the <, >., AF Area Selection Lever, Multi-controller
 |
View all Canon EOS 7D Mark II manuals
Add to My Manuals
Save this manual to your list of manuals |
Page 50 highlights
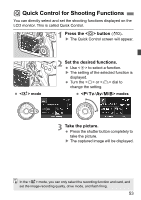
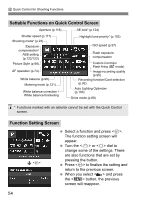
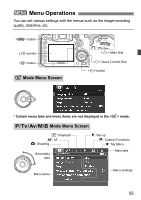
Basic Operation p AF Area Selection Lever The lever can be tilted to the right. Use it to select the AF area selection mode. After pressing the button, tilt the . Pressing the button will make the AF area selection mode and AF point selectable for 6 sec. (9). Then, when you tilt the to the right within that time, you can change the AF area selection mode. You can also press the button and then press the button to select the AF area selection mode. 9 Multi-controller The consists of an eight-direction key and a button at the center. Use it to select the AF point, correct the white balance, move the AF point or magnifying frame during Live View shooting, scroll around magnified images during playback, operate the Quick Control screen, etc. You can also use it to select and set menu items. For menus and Quick Control, the Multi-controller works only in the vertical and horizontal directions . It does not work in diagonal directions. 50
-
 1
1 -
2
-
3
-
4
-
5
-
6
-
7
-
8
-
9
-
10
-
11
-
12
-
13
-
14
-
15
-
16
-
17
-
18
-
19
-
20
-
21
-
22
-
23
-
24
-
25
-
26
-
27
-
28
-
29
-
30
-
31
-
32
-
33
-
34
-
35
-
36
-
37
-
38
-
39
-
40
-
41
-
42
-
43
-
44
-
 45
45 -
 46
46 -
 47
47 -
 48
48 -
 49
49 -
 50
50 -
 51
51 -
 52
52 -
 53
53 -
 54
54 -
 55
55 -
56
-
57
-
58
-
59
-
60
-
61
-
62
-
63
-
64
-
65
-
66
-
67
-
68
-
69
-
70
-
71
-
72
-
73
-
74
-
75
-
76
-
77
-
78
-
79
-
80
-
81
-
82
-
83
-
84
-
85
-
86
-
87
-
88
-
89
-
90
-
91
-
92
-
93
-
94
-
95
-
96
-
97
-
98
-
99
-
100
-
101
-
102
-
103
-
104
-
105
-
106
-
107
-
108
-
109
-
110
-
111
-
112
-
113
-
114
-
115
-
116
-
117
-
118
-
119
-
120
-
121
-
122
-
123
-
124
-
125
-
126
-
127
-
128
-
129
-
130
-
131
-
132
-
133
-
134
-
135
-
136
-
137
-
138
-
139
-
140
-
141
-
142
-
143
-
144
-
145
-
146
-
147
-
148
-
149
-
150
-
151
-
152
-
153
-
154
-
155
-
156
-
157
-
158
-
159
-
160
-
161
-
162
-
163
-
164
-
165
-
166
-
167
-
168
-
169
-
170
-
171
-
172
-
173
-
174
-
175
-
176
-
177
-
178
-
179
-
180
 |
 |
