Canon MX850 Quick Start Guide - Page 114
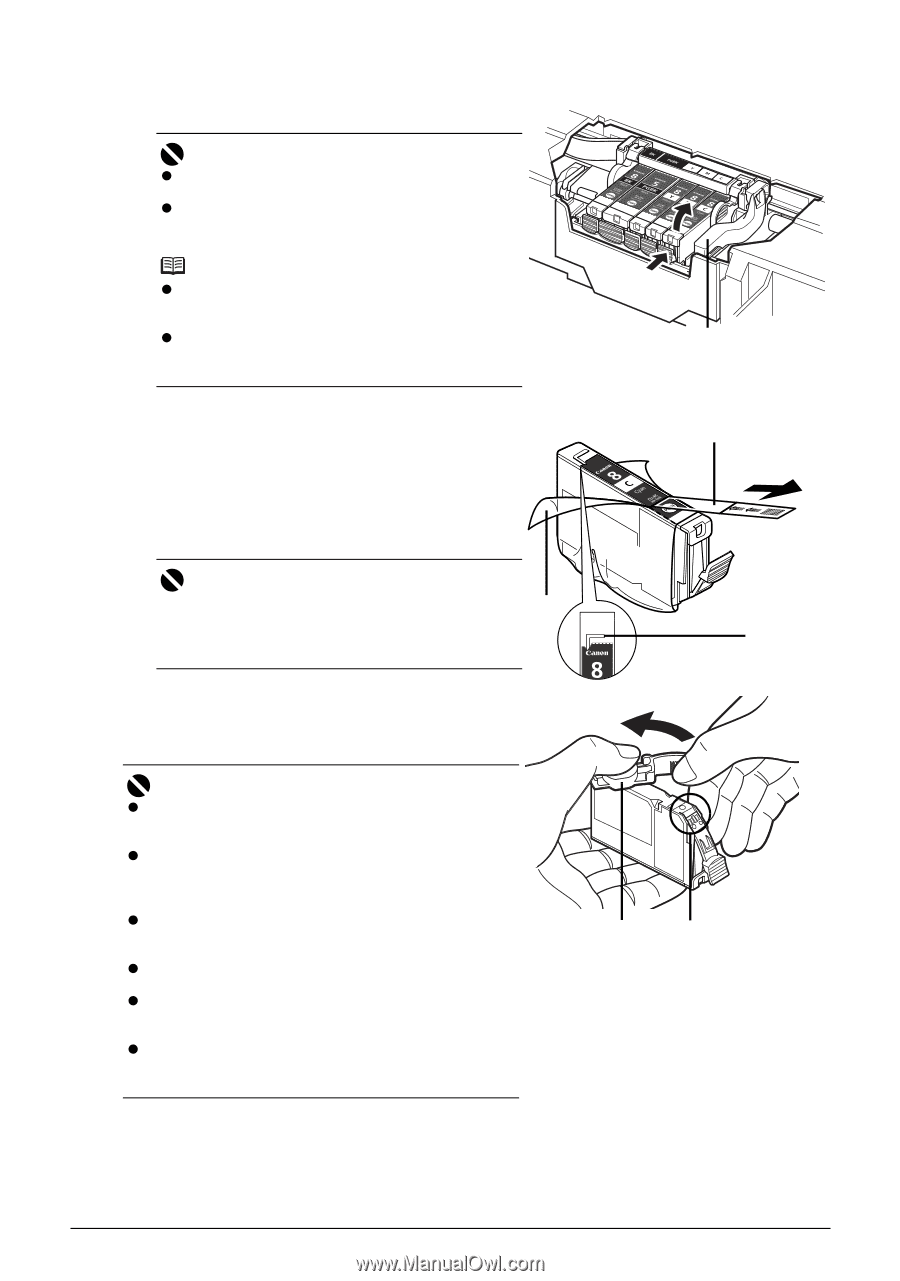
Remove the ink tank whose lamp is flashing fast., Prepare the replacement tank. - ink replacement
 |
UPC - 013803087871
View all Canon MX850 manuals
Add to My Manuals
Save this manual to your list of manuals |
Page 114 highlights
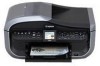
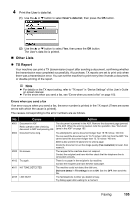
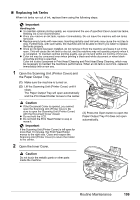
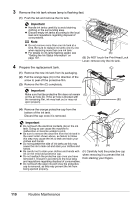
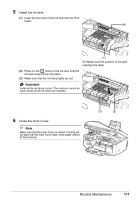
3 Remove the ink tank whose lamp is flashing fast. (1) Push the tab and remove the ink tank. Important z Handle ink tanks carefully to avoid staining clothing or the surrounding area. z Discard empty ink tanks according to the local laws and regulations regarding disposal of consumables. Note z Do not remove more than one ink tank at a time. Be sure to replace ink tanks one by one when replacing more than one ink tank. z For details on ink lamp flashing speed, see "Getting the Ink Status Information" on page 107. (B) (B) Do NOT touch the Print Head Lock Lever; remove only the ink tank. 4 Prepare the replacement tank. (C) (1) Remove the new ink tank from its packaging. (2) Pull the orange tape (C) in the direction of the arrow to peel off the protective film. (3) Remove the film (D) completely. Important Make sure that the protective film does not remain (D) on the air hole (E). If the air hole is blocked with the remaining film, ink may leak out or may not (E) eject properly. (4) Remove the orange protective cap from the bottom of the ink tank. Discard the cap once it is removed. Important z Do not touch the electrical contacts (G) on the ink tank. Doing so can cause the machine to malfunction or become unable to print. z Be sure to remove the clear film from the ink tank in the exact order shown above, as failure to follow this step may cause the ink to leak and stain your clothes and hands. z Do not squeeze the side of ink tanks as this may cause the ink to leak out and stain your clothes and (F) (G) hands. z Be careful not to stain your clothes and hands with (F) Carefully hold the protective cap ink on the removed protective cap. z Do not reattach the protective cap once you have removed it. Discard it according to the local laws when removing it to prevent the ink from staining your fingers. and regulations regarding disposal of consumables. z Do not touch the open ink port once the protective cap is removed, as this may prevent the ink from being ejected properly. 110 Routine Maintenance
-
 1
1 -
2
-
3
-
4
-
5
-
6
-
7
-
8
-
9
-
10
-
11
-
12
-
13
-
14
-
15
-
16
-
17
-
18
-
19
-
20
-
21
-
22
-
23
-
24
-
25
-
26
-
27
-
28
-
29
-
30
-
31
-
32
-
33
-
34
-
35
-
36
-
37
-
38
-
39
-
40
-
41
-
42
-
43
-
44
-
45
-
46
-
47
-
48
-
49
-
50
-
51
-
52
-
53
-
54
-
55
-
56
-
57
-
58
-
59
-
60
-
61
-
62
-
63
-
64
-
65
-
66
-
67
-
68
-
69
-
70
-
71
-
72
-
73
-
74
-
75
-
76
-
77
-
78
-
79
-
80
-
81
-
82
-
83
-
84
-
85
-
86
-
87
-
88
-
89
-
90
-
91
-
92
-
93
-
94
-
95
-
96
-
97
-
98
-
99
-
100
-
101
-
102
-
103
-
104
-
105
-
106
-
107
-
108
-
 109
109 -
 110
110 -
 111
111 -
 112
112 -
 113
113 -
 114
114 -
 115
115 -
 116
116 -
 117
117 -
 118
118 -
 119
119 -
120
-
121
-
122
-
123
-
124
-
125
-
126
-
127
-
128
-
129
-
130
-
131
-
132
-
133
-
134
-
135
-
136
-
137
-
138
-
139
-
140
-
141
-
142
-
143
-
144
-
145
-
146
-
147
-
148
-
149
-
150
-
151
-
152
-
153
-
154
-
155
-
156
-
157
-
158
-
159
-
160
-
161
-
162
-
163
-
164
-
165
-
166
-
167
-
168
-
169
-
170
-
171
-
172
-
173
-
174
-
175
-
176
-
177
-
178
-
179
-
180
-
181
-
182
-
183
-
184
-
185
-
186
-
187
-
188
 |
 |