Canon MX850 Quick Start Guide - Page 139
Check Pattern on and Printing Does Not Start/Printing Is Blurred - error code 5100
 |
UPC - 013803087871
View all Canon MX850 manuals
Add to My Manuals
Save this manual to your list of manuals |
Page 139 highlights
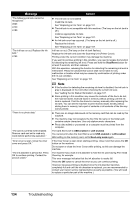
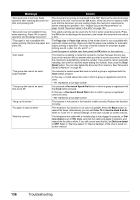
Message "Auto head align has failed. Press OK and repeat operation. " "**** Error code" "Scanner is not operating correctly." "Incompatible device detected. Remove the device." "An unsupported USB hub is connected. Remove the hub." "Document in ADF. Redo operation after checking document in ADF and pressing OK." Action Possible causes are as follows: z Print Head nozzles are clogged. Press the OK button to dismiss the error message, and print the nozzle check pattern to check the status of the Print Head. See "Printing the Nozzle Check Pattern" on page 115 and "Printing Does Not Start/Printing Is Blurred/ Colors Are Wrong/Straight Lines Are Misaligned" on page 142. z Paper of size other than A4 or Letter is loaded in the Rear Tray. Press the OK button on the machine to dismiss the error message, then load two sheets of A4/Letter-sized paper (MP-101) in the Rear Tray. Automatic Print Head Alignment cannot be performed using paper from the Cassette. For Automatic Print Head Alignment, always load paper in the Rear Tray. z The Paper Output Slot is exposed to strong light. Press the OK button to dismiss the error message, and then adjust your operating environment and/or the position of the machine so that the Paper Output Slot is not exposed directly to strong light. After carrying out the above measures, if the problem continues after aligning the Print Head again, press the OK button to dismiss the error message, and then perform Manual Print Head Alignment. For details on Manual Print Head Alignment, see "Manual Print Head Alignment" on page 120. "****" is an alphanumeric code that varies according to the error status. z When "5100" or "5110" is displayed (1)Turn off the machine, and lift the Scanning Unit (Printer Cover) to check if there are any foreign objects inside the machine. (2)Move the Print Head Holder (the part that holds the ink tanks) to the right side gently by hand if you can move it manually. Make sure that the ink tanks are securely set in the Print Head Holder. (3)Turn on the machine. If the same error occurs, follow the instruction in "When other codes are displayed" described below. z When other codes are displayed Turn off the machine, and unplug the power cord of the machine from the power supply. After five minutes or more, plug the power cord of the machine back in, and then turn on the machine. If the same error occurs, contact your Canon service representative. Turn off the machine, and unplug the power cord of the machine from the power supply. After five minutes or more, plug the power cord of the machine back in, and then turn on the machine. If the same error occurs, contact your Canon service representative. z A communication time out occurs if an operation takes too long or if it takes too much time to send data. This may cancel printing. In such cases, disconnect and reconnect the USB cable. When printing from a PictBridge compliant device, depending on the model or brand of your device, you may have to select a PictBridge compliant print mode on the device before connecting it to the machine. You may also have to turn on your device or select Play mode manually after connecting the device to the machine. Perform necessary operations before connecting your device referring to its instruction manual. If the error is still not resolved, check if you can print another photograph. z Check your device connected to the machine. Only PictBridge compliant devices or the optional Bluetooth Unit BU-30 can be connected to the machine for direct printing. If a PictBridge compliant device is connected via a USB hub, remove the hub and connect it directly to the machine. If a PictBridge compliant device is connected via a USB hub, remove the hub and connect it directly to the machine. The document is jammed in the ADF. Remove the document page jammed in the ADF, then press the OK button. When the error is cleared, redo the operation. See "Document Jams in the ADF" on page 152. Troubleshooting 135
-
 1
1 -
2
-
3
-
4
-
5
-
6
-
7
-
8
-
9
-
10
-
11
-
12
-
13
-
14
-
15
-
16
-
17
-
18
-
19
-
20
-
21
-
22
-
23
-
24
-
25
-
26
-
27
-
28
-
29
-
30
-
31
-
32
-
33
-
34
-
35
-
36
-
37
-
38
-
39
-
40
-
41
-
42
-
43
-
44
-
45
-
46
-
47
-
48
-
49
-
50
-
51
-
52
-
53
-
54
-
55
-
56
-
57
-
58
-
59
-
60
-
61
-
62
-
63
-
64
-
65
-
66
-
67
-
68
-
69
-
70
-
71
-
72
-
73
-
74
-
75
-
76
-
77
-
78
-
79
-
80
-
81
-
82
-
83
-
84
-
85
-
86
-
87
-
88
-
89
-
90
-
91
-
92
-
93
-
94
-
95
-
96
-
97
-
98
-
99
-
100
-
101
-
102
-
103
-
104
-
105
-
106
-
107
-
108
-
109
-
110
-
111
-
112
-
113
-
114
-
115
-
116
-
117
-
118
-
119
-
120
-
121
-
122
-
123
-
124
-
125
-
126
-
127
-
128
-
129
-
130
-
131
-
132
-
133
-
 134
134 -
 135
135 -
 136
136 -
 137
137 -
 138
138 -
 139
139 -
 140
140 -
 141
141 -
 142
142 -
 143
143 -
 144
144 -
145
-
146
-
147
-
148
-
149
-
150
-
151
-
152
-
153
-
154
-
155
-
156
-
157
-
158
-
159
-
160
-
161
-
162
-
163
-
164
-
165
-
166
-
167
-
168
-
169
-
170
-
171
-
172
-
173
-
174
-
175
-
176
-
177
-
178
-
179
-
180
-
181
-
182
-
183
-
184
-
185
-
186
-
187
-
188
 |
 |