Canon MX850 Quick Start Guide - Page 121
Print Head Cleaning
 |
UPC - 013803087871
View all Canon MX850 manuals
Add to My Manuals
Save this manual to your list of manuals |
Page 121 highlights
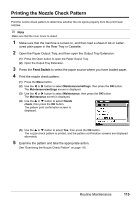
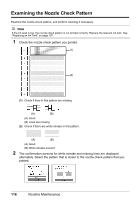
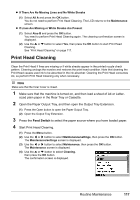
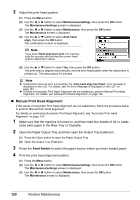
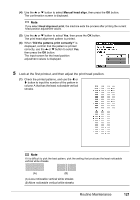
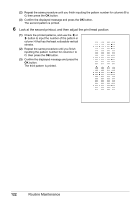
z If There Are No Missing Lines and No White Streaks (1) Select All A and press the OK button. You do not need to perform Print Head Cleaning. The LCD returns to the Maintenance screen. z If Lines Are Missing or White Streaks Are Present (1) Select Also B and press the OK button. You need to perform Print Head Cleaning again. The cleaning confirmation screen is displayed. (2) Use the { or } button to select Yes, then press the OK button to start Print Head Cleaning. See "Print Head Cleaning" on page 117. Print Head Cleaning Clean the Print Head if lines are missing or if white streaks appear in the printed nozzle check pattern. Cleaning unclogs the nozzles and restores the print head condition. Note that cleaning the Print Head causes used ink to be absorbed in the ink absorber. Cleaning the Print Head consumes ink, so perform Print Head Cleaning only when necessary. Note Make sure that the Inner Cover is closed. 1 Make sure that the machine is turned on, and then load a sheet of A4 or Letter- sized plain paper in the Rear Tray or Cassette. 2 Open the Paper Output Tray, and then open the Output Tray Extension. (1) Press the Open button to open the Paper Output Tray. (2) Open the Output Tray Extension. 3 Press the Feed Switch to select the paper source where you have loaded paper. 4 Start Print Head Cleaning. (1) Press the Menu button. (2) Use the [ or ] button to select Maintenance/settings, then press the OK button. The Maintenance/settings screen is displayed. (3) Use the [ or ] button to select Maintenance, then press the OK button. The Maintenance screen is displayed. (4) Use the { or } button to select Cleaning, then press the OK button. The confirmation screen is displayed. Routine Maintenance 117
-
 1
1 -
2
-
3
-
4
-
5
-
6
-
7
-
8
-
9
-
10
-
11
-
12
-
13
-
14
-
15
-
16
-
17
-
18
-
19
-
20
-
21
-
22
-
23
-
24
-
25
-
26
-
27
-
28
-
29
-
30
-
31
-
32
-
33
-
34
-
35
-
36
-
37
-
38
-
39
-
40
-
41
-
42
-
43
-
44
-
45
-
46
-
47
-
48
-
49
-
50
-
51
-
52
-
53
-
54
-
55
-
56
-
57
-
58
-
59
-
60
-
61
-
62
-
63
-
64
-
65
-
66
-
67
-
68
-
69
-
70
-
71
-
72
-
73
-
74
-
75
-
76
-
77
-
78
-
79
-
80
-
81
-
82
-
83
-
84
-
85
-
86
-
87
-
88
-
89
-
90
-
91
-
92
-
93
-
94
-
95
-
96
-
97
-
98
-
99
-
100
-
101
-
102
-
103
-
104
-
105
-
106
-
107
-
108
-
109
-
110
-
111
-
112
-
113
-
114
-
115
-
 116
116 -
 117
117 -
 118
118 -
 119
119 -
 120
120 -
 121
121 -
 122
122 -
 123
123 -
 124
124 -
 125
125 -
 126
126 -
127
-
128
-
129
-
130
-
131
-
132
-
133
-
134
-
135
-
136
-
137
-
138
-
139
-
140
-
141
-
142
-
143
-
144
-
145
-
146
-
147
-
148
-
149
-
150
-
151
-
152
-
153
-
154
-
155
-
156
-
157
-
158
-
159
-
160
-
161
-
162
-
163
-
164
-
165
-
166
-
167
-
168
-
169
-
170
-
171
-
172
-
173
-
174
-
175
-
176
-
177
-
178
-
179
-
180
-
181
-
182
-
183
-
184
-
185
-
186
-
187
-
188
 |
 |