Canon PIXMA MP140 MP140 series Quick Start Guide - Page 27
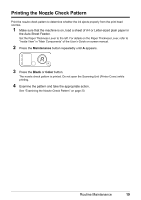
Load the checked sheet on the Platen Glass., Press the, button repeatedly until, appears., button. - error codes
 |
View all Canon PIXMA MP140 manuals
Add to My Manuals
Save this manual to your list of manuals |
Page 27 highlights
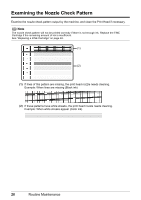
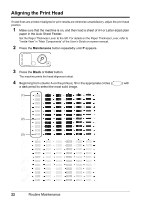
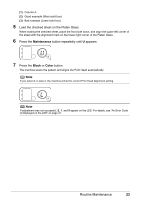
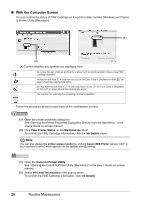
(1) Column A (2) Good example (Most solid box) (3) Bad example (Least solid box) 5 Load the checked sheet on the Platen Glass. When loading the checked sheet, place the front side down, and align the upper left corner of the sheet with the alignment mark on the lower right corner of the Platen Glass. 6 Press the Maintenance button repeatedly until U appears. 7 Press the Black or Color button. The machine scans the pattern and aligns the Print Head automatically. Note If you select L in step 2, the machine prints the current Print Head Alignment setting. Note If adjustment was not successful, E, 1, and 9 appear on the LED. For details, see "An Error Code Is Displayed on the LED" on page 37. Routine Maintenance 23
-
 1
1 -
2
-
3
-
4
-
5
-
6
-
7
-
8
-
9
-
10
-
11
-
12
-
13
-
14
-
15
-
16
-
17
-
18
-
19
-
20
-
21
-
 22
22 -
 23
23 -
 24
24 -
 25
25 -
 26
26 -
 27
27 -
 28
28 -
 29
29 -
 30
30 -
 31
31 -
 32
32 -
33
-
34
-
35
-
36
-
37
-
38
-
39
-
40
-
41
-
42
-
43
-
44
-
45
-
46
-
47
-
48
-
49
-
50
-
51
-
52
-
53
-
54
-
55
-
56
-
57
-
58
-
59
-
60
-
61
-
62
-
63
-
64
-
65
-
66
-
67
-
68
-
69
-
70
-
71
-
72
 |
 |

23
Routine Maintenance
(1)
Column A
(2)
Good example (Most solid box)
(3)
Bad example (Least solid box)
5
Load the checked sheet on the Platen Glass.
When loading the checked sheet, place the front side down, and align the upper left corner of
the sheet with the alignment mark on the lower right corner of the Platen Glass.
6
Press the
Maintenance
button repeatedly until
U
appears.
7
Press the
Black
or
Color
button.
The machine scans the pattern and aligns the Print Head automatically.
Note
If you select
L
in step 2, the machine prints the current Print Head Alignment setting.
Note
If adjustment was not successful,
E
,
1
, and
9
appear on the LED. For details, see “An Error Code
Is Displayed on the LED” on page 37.